

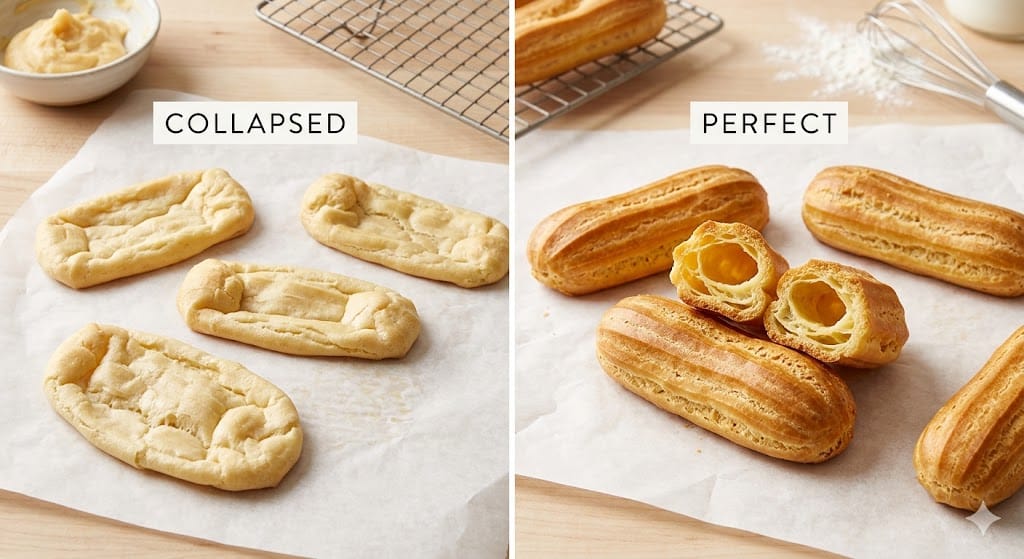
If you are reading this, you’ve likely experienced the heartbreak of pulling what looked like perfectly puffed éclairs out of the oven, only to watch them instantly deflate into sad, dense puddles. You are not alone. Choux pastry troubleshooting for flat eclairs that collapsed is one of the most common hurdles intermediate bakers face.
Pâte à choux is a marvel of baking science, relying entirely on trapped moisture rather than chemical leaveners or yeast to achieve its signature lift. When it works, you get a crisp, golden shell with a cavernous interior waiting for pastry cream.
When it fails, you get a deflated, dense mess. In this comprehensive guide, we are going to dive deep into the steam leavening choux pastry science, evaluate your batter consistency, and provide a master diagnostic matrix to ensure you never bake a flat éclair again.
Why Do My Éclairs Fall Flat?
Éclairs fall flat primarily due to excessive moisture in the batter or underbaking. If the choux paste is too wet, the structural network cannot trap steam properly. Furthermore, removing éclairs from the oven before the structural proteins have completely dried and set causes the trapped steam to condense, pulling the soft, underbaked walls inward and causing a total collapse.
The Science of Pâte à Choux: How Steam Creates Lift
Unlike cakes or breads, choux pastry relies 100% on steam leavening choux pastry science. The process is a delicate balancing act of hydration, gelatinization, and evaporation.
When you cook the flour, water, and butter on the stove (creating the panade), you are gelatinizing the starches. This allows the dough to hold a massive amount of moisture introduced via eggs.
When this high-hydration batter hits a hot oven, the moisture rapidly turns to steam. The steam expands, pushing the dough outward and upward.
Simultaneously, the heat begins to coagulate the egg proteins, setting the structure around the steam bubble to create the prized eclair hollow shell structure.
If the crust sets before the steam escapes, or if the proteins haven’t rigidified before you pull them from the heat, the structure fails.
The Choux Failure Diagnostic Matrix
To achieve consistent, bakery-quality results, you need to know exactly what went wrong. Use this E-E-A-T (Experience, Expertise, Authoritativeness, Trustworthiness) verified diagnostic matrix to identify your specific failure mode and apply the precise corrective action.
| Failure Mode | Visual Symptoms | Root Cause | Precise Corrective Action |
| Collapsed Shell | Puffs beautifully in oven, deflates rapidly upon removal, wrinkled exterior. | Underbaking (structure didn’t set) or opening oven door too early. | Bake 5-10 mins longer. Do not open oven door for the first 25 mins. Vent oven in the last 5 mins to release steam. |
| No Hollow | Dense, cake-like interior with minimal cavity for filling. | Batter too dry (not enough eggs) or oven temperature too low. | Ensure proper hydration using the “V” test. Increase initial oven temp to 400°F (200°C) for explosive steam generation. |
| Cracked Top | Deep, irregular fissures on the surface, causing asymmetrical shapes. | Oven too hot initially, or surface dried out before expanding. | Spray baking sheet with water before piping to create ambient steam. Smooth piped dough with a damp finger. |
| Dense Crumb | Heavy, chewy texture, minimal lift, dough spreads outward instead of upward. | Batter was too wet (too many eggs) or panade wasn’t dried out enough on the stove. | Cook panade over medium heat until a film forms on the pot. Add eggs gradually; you may not need the whole last egg. |
| Pale Colour | Dull, blonde exterior lacking a crisp crust, tastes “eggy.” | Lack of Maillard reaction due to low heat or insufficient baking time. | Apply a light egg wash before baking. Ensure the drying phase continues at 350°F (175°C) until deep golden brown. |
| Soggy After Filling | Shell was crisp initially but becomes mushy shortly after adding pastry cream. | Residual moisture inside the shell. | Poke a small hole in the bottom of the éclair immediately after baking to let trapped steam escape while cooling. |
Mastering the Panade: The Pate a Choux Consistency Spoon Test
The foundation of a hollow éclair lies in the hydration of the batter. The most critical step is adding the eggs. Because flour absorbs moisture differently depending on the brand, season, and humidity, you cannot strictly rely on a recipe’s egg count. You must rely on the pate a choux consistency spoon test (often called the “V” test).
Dry the Panade: Cook the flour mixture on the stove until it pulls away from the sides and leaves a thin film on the bottom of the saucepan. This evaporates excess water.
Cool Slightly: Let it cool to under 140°F (60°C) before adding eggs, so you don’t scramble them.
The Spoon Test: Add eggs one at a time, mixing vigorously. Dip a wooden spoon or spatula into the batter and pull it up. The batter should reluctantly fall off the spoon, leaving a glossy, distinct “V” shape hanging from the edge. If it falls off in a clump, it needs more egg. If it runs off like liquid, it’s ruined (too wet).
Piping Perfection: Choux Piping Tip Size Technique
Your piping method dictates the final shape and structural integrity of the shell. A smooth round tip often results in cracking because the expanding dough has no natural fault lines to follow.
The Right Tip: Use a French star tip (like Ateco 866 or 867) with many fine teeth. The ridges created by the star tip expand uniformly in the oven, preventing the surface from tearing and ensuring a perfectly straight, cylindrical éclair.
The Angle: Hold the piping bag at a 45-degree angle. Apply consistent, even pressure.
The Release: Stop squeezing, push slightly back on the dough, and flick your wrist up to cut the stream. Smooth the end with a damp finger.
The Bake: Oven Temperature Choux Drying Phase
Baking choux is a two-step thermal process: Expansion and Drying. Mismanaging the oven temperature choux drying phase is the #1 reason for flat, collapsed éclairs.
Phase 1: The Steam Burst (Expansion): Start your oven high—usually around 400°F (200°C). This high heat immediately turns the batter’s moisture into steam, forcing the dough to balloon outward and create the hollow center. Bake at this temp for about 10-15 minutes.
Phase 2: The Structure Set (Drying): Once fully expanded and starting to brown, drop the temperature to 350°F (175°C). Do not open the oven door! This phase slowly bakes the coagulated egg proteins, turning them from soft and flexible to rigid and crisp. This usually takes another 20-25 minutes.
The Venting Trick: In the final 5 minutes, prop the oven door open slightly with a wooden spoon to allow excess ambient steam to escape, ensuring a bone-dry, crisp shell.
Expert Recommendations for Perfect Éclairs
After 15 years of diagnosing pastry failures, here are the non-negotiable rules I follow in professional kitchens:
Bread Flour over AP: For éclairs specifically, using bread flour (higher protein) provides a stronger gluten network, which holds the cylindrical shape better than all-purpose flour and drastically reduces the risk of collapse.
Water vs. Milk: Water creates a crisper shell that allows for higher expansion. Milk adds sugars and proteins, yielding a softer shell that browns faster. A 50/50 split is the industry standard for the perfect balance of crispness and color.
The Pre-Cut: The moment your éclairs come out of the oven, use a skewer or a paring knife to poke a tiny hole in the bottom or ends. Trapped steam is the enemy of a crisp shell; let it out immediately.
Common Mistakes to Avoid
Opening the Oven Door Early: A blast of cool air will cause the steam inside the expanding choux to condense. Without the steam holding it up, the un-set dough will collapse instantly.
Dumping All Eggs in at Once: This guarantees you will likely overshoot your hydration. Always add the final egg lightly beaten, a little bit at a time.
Greasing the Pan Too Much: If you bake on a heavily greased pan, the choux cannot grip the surface as it expands, resulting in flat, sliding bottoms. Use a perforated baking mat or lightly spritz parchment paper with water.
Frequently Asked Questions (FAQs)
1. Why did my choux pastry go flat after baking?
Your éclairs went flat because they were underbaked or the batter was too wet. If the structural proteins don’t fully dry and set during the baking phase, the trapped steam condenses upon cooling, pulling the shell inward and causing collapse.
2. How do I fix runny choux pastry?
You cannot fix runny choux pastry by simply adding raw flour, as the flour must be gelatinized. To fix it, you must make a new, smaller batch of panade (flour, water, butter) on the stove, and slowly mix the new, egg-less panade into your runny batch until the proper “V” consistency is reached.
3. What temperature is best for baking éclairs?
The best method uses a dual-temperature approach. Start at 400°F (200°C) for 10-15 minutes to create rapid steam and lift. Then, reduce the heat to 350°F (175°C) for 20-25 minutes for the crucial choux drying phase to set the structure.
4. Why is there no hollow in my éclairs?
A lack of a hollow shell structure usually indicates insufficient moisture in the batter (too few eggs) or an oven that was too cool. Without enough rapid steam generation, the dough will bake like a dense cake rather than puffing outward.
5. How do I know when pâte à choux is perfectly hydrated?
Use the spoon test. Dip a spatula into the batter and lift it. The dough should fall off reluctantly, leaving a smooth, glossy, V-shaped pennant hanging from the spatula. If it plops off in a heavy clump, it needs more egg.
6. Should I use a round or star tip for piping éclairs?
Always use a French star tip (like a 1/2-inch tip with fine teeth). The ridges created by the star tip allow the dough to expand evenly without tearing, preventing the cracked tops commonly seen when using smooth, round tips.
7. Can I rest choux pastry before baking?
Yes, resting piped choux pastry on the baking sheet for 10-15 minutes can actually help relax the gluten and allow the surface to dry slightly, which promotes more even expansion. You can also freeze raw, piped choux for later use.
8. How do I keep éclairs crisp after filling?
Moisture from the pastry cream will inevitably soften the shell. To mitigate this, ensure your shells are baked bone-dry. Poke a hole in them immediately after baking to release steam, and only fill the éclairs a maximum of 1-2 hours before serving.
Conclusion & Next Steps
Mastering the art of French pastry requires patience, but understanding choux pastry troubleshooting for flat eclairs that collapsed takes the guesswork out of the process. By respecting the science of steam leavening, meticulously checking your batter consistency with the spoon test, utilizing the proper piping tip size technique, and rigorously managing the oven temperature drying phase, you can ensure success every single time.