Let’s be honest for a second — baking isn’t just cooking. It’s more like kitchen science. A tiny mistake in measuring your flour or sugar can turn your soft cookies into hard rocks or make your cake collapse in the middle. Accurate measuring is the hidden secret that separates good bakers from great ones.
Many beginners think “close enough” is fine when measuring ingredients. But in baking, even a small difference can change the whole texture, flavor, and structure of what you’re making. So, if you’ve ever wondered why your brownies are too dry or your muffins don’t rise the same way twice — this article will show you exactly how to measure like a pro.
Why Measuring Accurately Matters
Baking is all about ratios and chemical reactions. Each ingredient plays a specific role — flour provides structure, sugar adds sweetness and moisture, eggs bind everything together, and baking powder or soda helps it rise.
If you add too much of one or too little of another, those reactions can fail. For example:
| Ingredient | What It Does | What Happens If You Mis-measure |
|---|---|---|
| Flour | Adds structure | Too much makes it dense or dry |
| Sugar | Adds sweetness and tenderness | Too much causes spreading or burning |
| Butter/Oil | Adds moisture and flavor | Too much makes it greasy, too little makes it crumbly |
| Baking Powder/Soda | Helps rise | Too much makes it taste bitter, too little makes it flat |
| Eggs | Bind and enrich | Too many make it rubbery, too few make it fall apart |
Think of baking like building a house — you can’t just “eyeball” the bricks and expect it to stand tall. You need balance, structure, and the right foundation.
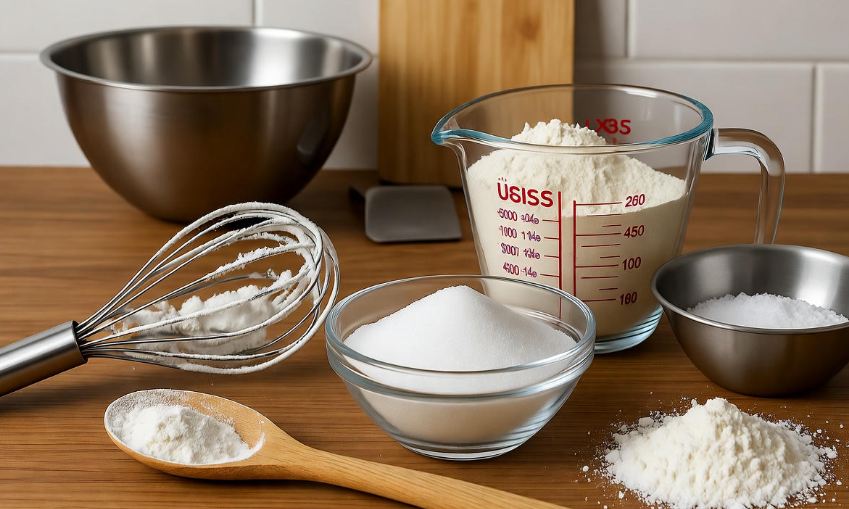
Use the Right Measuring Tools 🧁
Before we even get into how to measure, you need to have the right equipment. You can’t measure liquids with a dry measuring cup or scoop flour with a tablespoon and expect perfection.
Here’s a quick reference table:
| Type of Ingredient | Best Tool to Use | Why It Matters |
|---|---|---|
| Dry ingredients (flour, sugar, cocoa, etc.) | Dry measuring cups or a kitchen scale | Allows you to level off for accuracy |
| Liquid ingredients (milk, oil, water, etc.) | Clear liquid measuring cup with spout | Designed for eye-level accuracy |
| Small amounts (baking powder, salt, vanilla, etc.) | Measuring spoons | Keeps small measurements consistent |
If you love baking, investing in a digital kitchen scale is worth it. Professional bakers rarely use cups — they use grams because it’s much more precise. 1 cup of flour can weigh anywhere between 110g and 150g depending on how it’s packed. That’s a huge difference!
How to Measure Dry Ingredients the Right Way
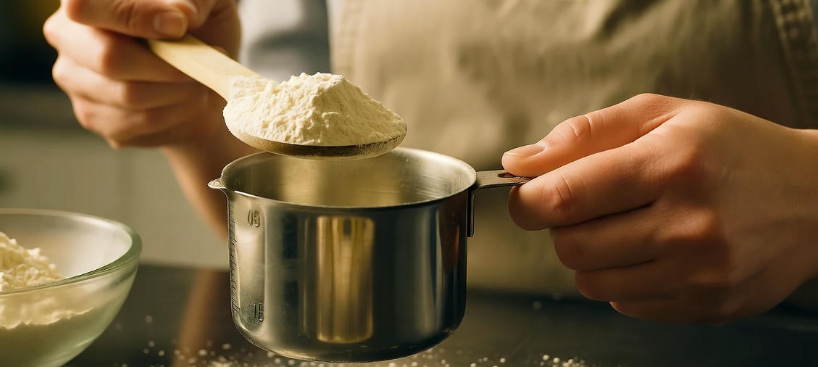
This is where most people make mistakes. Let’s take flour, for example. The wrong way is to scoop directly from the bag with your cup — it packs the flour down, giving you too much.
Here’s the right way:
-
Fluff the flour with a spoon before measuring.
-
Spoon the flour lightly into your measuring cup.
-
Level it off with a flat edge (like the back of a knife).
Never tap or shake the cup — that compacts it.
If you’re using a scale, just weigh out what the recipe says (e.g., 120g of flour per cup).
The same rule applies for powdered sugar, cocoa powder, or cornstarch. Always spoon and level — don’t scoop directly.
Quick Tip:
When using brown sugar, it’s usually written as “packed” in recipes. That means you should press it firmly into the cup until it holds shape when turned out.
How to Measure Liquid Ingredients Correctly 💧
Liquid ingredients are much easier to measure but still have their rules. Use a clear measuring cup with markings (like Pyrex or OXO). Pour the liquid in, then check the level at eye height — not from above or below.
If you’re using smaller amounts, like a tablespoon or teaspoon, make sure you fill the spoon to the top without spilling.
Pro Tip:
Oil can be tricky because it sticks to cups. If you need to measure honey, syrup, or molasses — lightly grease your cup or spoon with oil first. The sticky ingredients will slide right out!
How to Measure Sticky Ingredients (Honey, Syrup, etc.) 🍯
Sticky ingredients are everyone’s measuring nightmare. Here’s how to handle them like a pro:
-
Spray the cup or spoon lightly with cooking spray.
-
Or rub a little oil inside the cup before measuring.
This helps honey, peanut butter, or molasses glide right out, leaving no waste behind.
Another tip: You can warm up sticky ingredients like honey for a few seconds in the microwave — it becomes thinner and easier to pour.
How to Measure Ingredients by Weight
If you want truly consistent results, measuring by weight is the way to go. Professional bakers don’t use cups — they use grams because it’s more reliable.
Here’s why:
-
One cup of flour can weigh differently depending on how it’s scooped.
-
A kitchen scale ensures accuracy every single time.
Example:
Let’s say a recipe calls for:
-
1 cup flour = 120 grams
-
1 cup sugar = 200 grams
-
1 cup butter = 227 grams
When you use a scale, it doesn’t matter if your flour is fluffy or packed — you’ll always get the exact same results.
Bonus Tip: Many recipes online include both cup and gram conversions now, so it’s easy to switch.
How to Measure Semi-Solid Ingredients (Butter, Yogurt, etc.) 🧈
Butter is usually sold in sticks with markings (like “1 tbsp” or “½ cup”), which makes it simple. But if you have a large block, use a scale for accuracy.
For ingredients like yogurt, sour cream, or shortening, use a dry measuring cup and pack it down slightly, then level it off.
If the recipe calls for melted butter, always measure after melting unless stated otherwise — melted butter has less volume than solid.
Common Measuring Mistakes to Avoid 🚫
Even experienced bakers sometimes make simple errors that ruin a recipe. Here are some to watch out for:
-
Scooping flour directly from the bag – causes compacting and extra flour.
-
Not leveling off dry ingredients – adds inconsistency.
-
Using the wrong cup for liquids – changes measurement accuracy.
-
Measuring liquids at the wrong angle – always measure at eye level.
-
Guessing small amounts – “eyeballing” salt or baking powder leads to imbalance.
-
Forgetting to zero out your scale before weighing.
A good habit is to recheck every step — it only takes a few extra seconds but guarantees perfect results.
Some Handy Conversion Table 📏
| Ingredient | 1 Cup Equals (grams) | 1 Tablespoon Equals (grams) |
|---|---|---|
| All-purpose flour | 120 g | 8 g |
| Granulated sugar | 200 g | 12.5 g |
| Brown sugar (packed) | 220 g | 13.75 g |
| Butter | 227 g | 14 g |
| Cocoa powder | 100 g | 6.25 g |
| Milk | 240 g | 15 g |
| Water | 240 g | 15 g |
| Honey | 340 g | 21 g |
Save or print this table — it’s a baker’s best friend. 🧁
Little Tricks to Level Up Your Measuring Game
-
Use one set of measuring cups for dry and another for wet to avoid mix-ups.
-
Keep all tools clean and dry — water droplets can change measurements.
-
Measure ingredients before starting — it keeps your baking flow smooth.
-
Double-check recipes — if it says “sifted flour,” sift before measuring; if it says “flour, sifted,” measure first then sift.
-
Label your spoons and cups clearly so you don’t grab the wrong one in a rush.
Why Professional Bakers Prefer Scales 🎂
When it comes down to consistency, digital scales are unbeatable. Using one can:
-
Reduce cleanup (no need for multiple cups).
-
Make scaling recipes up or down super easy.
-
Ensure your cookies bake evenly every time.
Imagine you’re making a cake recipe you love, and you want to bake it again next week. If you measured by cups, your results might differ slightly. But if you measured in grams — same taste, same texture, every single time.
🎂 Curious why your cake doesn’t rise perfectly? Discover The Science Behind Perfect Cake Rising for answers.
Small Differences That Make a Big Impact
Even a single tablespoon can change the texture of your baked good.
-
1 tablespoon extra flour = tougher cookies.
-
1 tablespoon less sugar = less spread and sweetness.
-
Too much baking powder = bitter aftertaste.
So, when a recipe says “1 cup,” it means exactly that — not “almost” or “around.”
A Real-Life Example 🍪
Let’s test this. You’re baking chocolate chip cookies.
If you:
-
Scoop your flour directly → you get about 150g instead of 120g.
-
That’s 30g more flour (¼ cup).
End result?
Dry cookies, less spread, and a cakey texture.
But if you spoon and level → perfect chewy cookies every time.
That’s how big of a difference measuring can make.
Practical Tools Every Home Baker Should Own
| Tool | Why You Need It |
|---|---|
| Digital Kitchen Scale | For precision, especially in baking |
| Dry Measuring Cups | For flour, sugar, cocoa, etc. |
| Liquid Measuring Cup | For milk, oil, and other liquids |
| Measuring Spoons | For small quantities |
| Rubber Spatula | To scrape every last bit of ingredient |
| Small Bowl Set | To pre-measure ingredients before mixing |
Once you start using these regularly, baking feels smoother — almost effortless.
Keep Notes of Your Measurements 📝
Every kitchen environment is slightly different — humidity, temperature, altitude — they all affect ingredients. Keeping a small notebook of what works best for your recipes helps you perfect them over time.
For example:
“1 cup flour = 120g works best for cookies, but 125g makes perfect muffins.”
Those personal tweaks will make your baked goods uniquely yours.
A Few Fun Measuring Hacks 😍
-
Need buttermilk but don’t have it? Add 1 tbsp lemon juice to 1 cup milk.
-
Ran out of brown sugar? Mix white sugar with molasses (1 cup sugar + 1 tbsp molasses).
-
No scale? Use the spoon and level method religiously.
-
Mess-free measuring: Use parchment paper on your scale — pour ingredients directly, then toss it.
Final Thoughts 💭
Measuring accurately isn’t just about precision — it’s about predictability. When you know exactly what goes into your batter, you can trust what comes out of the oven.
It’s what turns a random recipe into a family favorite that works every single time.
So next time you bake, take a few extra moments to measure with care.
Your cakes will rise perfectly, your cookies will stay chewy, and your pastries will finally look like the pictures. 😋
FAQs ❓
1. What’s better — cups or grams?
Grams are more accurate because weight never changes. A cup can vary based on how tightly you pack it.
2. Should I sift flour before or after measuring?
If the recipe says “1 cup sifted flour,” sift first then measure.
If it says “1 cup flour, sifted,” measure first then sift.
3. Can I use the same measuring cup for wet and dry ingredients?
Technically you can, but it’s not ideal. Liquid cups have spouts and space at the top, while dry cups are meant to be leveled.
4. Do I really need a kitchen scale?
Yes! If you bake often, it’s a game-changer. Your results become consistent every single time.
5. Why do my cookies turn out different even with the same recipe?
It could be your measuring method — especially flour. Try weighing your ingredients for better control.
6. How do I store my measuring tools?
Keep them clean, dry, and stacked together. Moisture can ruin dry ingredients when reusing cups.
In short:
Baking isn’t about luck — it’s about precision. Measure accurately, follow the right steps, and watch your kitchen creations go from good to absolutely irresistible. 🧁✨