
Baking is one of the greatest joys in life, but if we’re being real with ourselves it also takes up hours of your day. Lest you end up covered with an explosion of flour, which is a remarkable powdery substance that somehow gets everywhere in the process of producing bread or cake, there’s also the time suckage of waiting for butter to soften and ingredients to be measured out. Whether it’s cookies for a bake sale or a birthday cake you’re baking, every minute is precious.
The good news? You don’t even need special gear or professional experience to cut the time you spend baking in half. Tiny tweaks to how you prep, organize and cook your recipes can save you hours every week. And these aren’t shortcuts that sacrifice quality — they’re smart tips the pros use every day to power through work and make more delicious breads in the same amount of time.
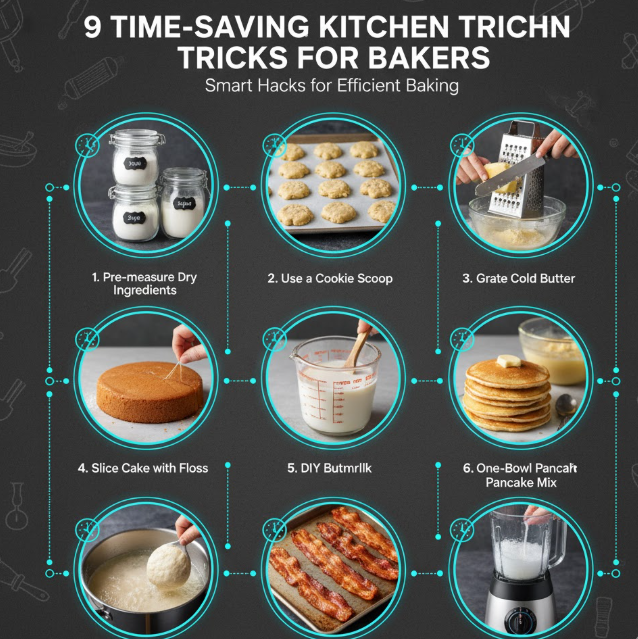
Here, nine tricks that will revolutionize your baking routine. From the make-ahead prep work that puts you on point to cool shortcuts that get dinner ready in a flash, these kitchen hacks will have you spending less time “auto-runnin'” to KFC and more time enjoying your beautiful dishes.
Fast Prep Techniques That Put You Ahead of the Game
The Mise en Place Magic
Professional bakers subscribe to “mise en place,” a French term that loosely translates as “everything in its place.” Before you turn on the oven, measure and organize each ingredient. It sounds like it would be more work in advance, but is a gigantic saver of time when you’re actually baking.
Here’s why that works: You’ll never discover, halfway through mixing, that you’re out of baking powder. There will be no stopping to measure flour and getting fingers stuck. There’s never a hiccup in the whole baking process chewing up from one step to the next.
Prepare small bowls or containers of each ingredient. Put them in the order that you will seize them. Break the eggs into a separate container (that way you can fish out any bits of shell without making a dark mess of your batter). Weigh your vanilla, set your oven temperature and have your pans waiting. That five minutes up front saves you 15 minutes of having to freak out and clean later.
Butter Softens in Minutes, Not Hours
And you neglected to pull the butter out of the fridge? Don’t hang around for two hours hoping it will soften. Cut your cold butter into small cubes — roughly 1-inch should do the trick. Spread them on a plate and allow them to stand for only about 10-15 minutes. A larger surface area equates to a quicker softening.
Need it even quicker? Fill a glass with hot water, allow it to sit for a minute to warm the glass and then dump out the water. Set the warm glass upside down over your butter cubes. The trapped heat forms a mini warming chamber that softens butter in roughly 5 minutes.
Another method: sandwich your wrapped butter between two pieces of parchment paper and clobber it lightly with a rolling pin. This is working the butter mechanically, not allowing it to come to a liquid state. You’ll have spreadable butter in less than a minute. Place softened butter into the container and attach the nozzle.
Smart Tools and Equipment Choices
Invest in a Kitchen Scale
How good can a measuring cup be? You can get 20-30% variations on flour depending on how you measure it! A digital kitchen scale entirely eradicates this issue.
| Method | Time | Accuracy | Cleanup |
|---|---|---|---|
| Traditional cups | 3-5 minutes per recipe | Variable (±20%) | Multiple cups to wash |
| Digital scale | 1-2 minutes per recipe | Precise (±1g) | One bowl to wash |
With a scale, you put your bowl on it, zero it out and add the first ingredient, zero once more and add the next. No dirty measuring cups. No scooping and leveling. Pour and see the numbers drop. There is a reason most professional recipes are in weight measurements: It’s faster, tidier and more accurate.
Good home models of kitchen scales range in cost from $15 to $50. The time you save has paid for itself in a few weeks of regular baking.
Parchment Paper Over Greasing
No more greasing and flouring pans. Parchment rounds for your cake pans that are pre-cut, or parchment sheets for cookies. It will save you 2-3 minutes per pan, and your baked goods release perfectly, every time.
Purchase pre-cut parchment rounds online or at baking supply stores — they come in sizes for 8-inch and 9-inch pans. If you’re baking cookie sheets, keep a roll of parchment paper near your baking area. You can reuse parchment sheets 2 or 3 times for your cookies (it depends on how sugar-coated your pans are).
Bonus benefit: Cleanup takes seconds. You just line the pans with parchment instead of scrubbing stuck-on batter out of them.
Batch Working Saves Me Hours A Week
Double It, and Double Your Power
How about a reality check: Baking one batch of cookies vs. two batches doesn’t take twice as long, or anywhere near that. Your work is not in the work itself (the mixing and baking), but rather in the setup, preheating time and cleanup. They aren’t much more work to make double or triple batches of, yet provide 200-300% more quantity.
Whip up several batches of your favorite cookie dough or muffin batter. Bake what you want now, and freeze the rest. Raw cookie dough freezes like a dream for up to three whole months. Scoop it into balls, freeze them on a tray and transfer to freezer bags. Should you get the cookie jones, bake them right from their frozen state — just add 2 to 3 minutes to the baking time.
This same strategy works for:
- Pie crusts (lay flat and freeze in disks, tightly wrapped in plastic)
- Muffin mix (portion out and freeze)
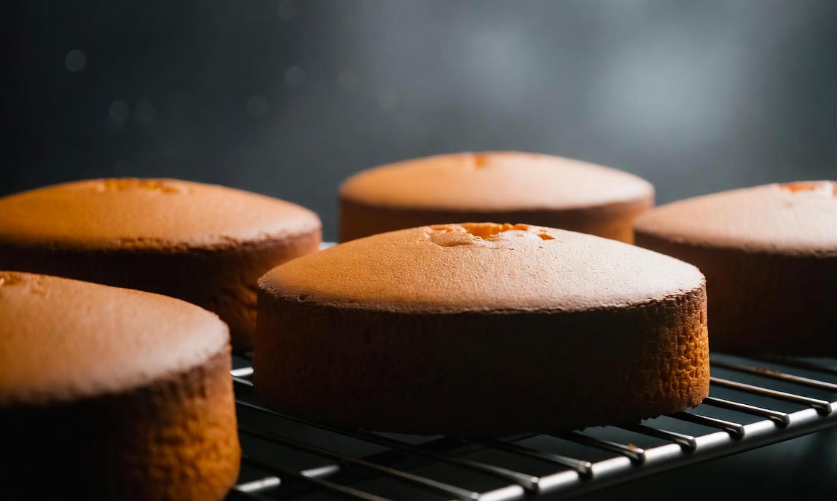
- Cake layers (bake and freeze, frost later)
- Scone dough (mould, freeze and bake fresh)
Pre-Portioned Dry Mixes
If you regularly cook the same recipes, prepare dry ingredient blends ahead of time. Whisk together flour, sugar, baking powder and salt (and spices, if using) for your favorite recipes. Keep these mixes in labelled containers or bags.
When baking day rolls around, you won’t have to bother with all the measuring of dry ingredients. All you do is pour in the premade mix, then mix in the wet ingredients and your work is done. This one is great for the pancakes, muffins, quick breads and cookie recipes.
Label each jar with the recipe name, when you mixed it and what wet ingredients to add. Dry mixes should keep for 2-3 months if stored in an airtight container in a cool, dry place.
Temperature Control Tricks
Cold Ingredients at a Rush
The majority of baking recipes require room-temperature eggs, butter and dairy. These ingredients are better developed, making it easier to mix and providing a more consistent texture in your finished product. But who remembers to pull eggs out two hours before baking?
For eggs: Submerge them in a bowl of warm (not hot) water for 5 to 10 minutes. They will come to room temperature and not even begin to cook.
For milk/buttermilk: Microwave for 10-15 seconds. Taste and stir; the broth should be barely warm, not hot.
For cream cheese: Cut it into small cubes and allow to sit for 10 minutes, or microwave at 50 percent power in 10-second increments until soft (microwave 5 seconds at a time after the first increment).
These tricks mean that your ingredients will cream the way they’re supposed to without having to sit around all morning.
Accelerate the Rise Time for Yeasted Doughs
Bread, or cinnamon rolls, don’t have to take all day. Keep in mind that the warmer the environment, the faster your bread will rise… but you don’t want doughy bread.
Warm your oven to its lowest setting for 1 minute, then turn it off. Then put your covered dough inside the warmed, but not hot, oven. This mild warmth reduces rising time by almost half. Your dough that typically takes 90 minutes could be done in anywhere from 50 to 60.
Other method: Bring a large bowl or your sink full of hot water. Place your dough in a walk until in covered water bath without getting water into the dough. If it cools, replace the hot water once. This is perfect for small dough amounts.
For more detailed techniques on working with yeast dough, check out King Arthur Baking’s comprehensive guide.
Organization Systems That Save Time
The Baking Station Setup
Consolidate all your baking gear in a single designated spot. Keep products you use most often at eye level and within easy reach. This easy organizer saves so much time digging around through cabinets.
Your baking station should include:
- Flour, sugar and all other sorts of dry goods labeled in clear containers
- One drawer or caddy of measuring tools (scale, spoons, cups)
- Extracts and flavorings grouped together
- Baking powder, baking soda and salt in small containers that you can easily access
- Mixing bowls nested together
- Parchment paper and foil close at hand
It’s all about saving time, and when everything has a place where it belongs, you’ll move quicker through recipes with less frustration. You’ll know when supplies run low long before you’re mid-bake, too.
The One-Bowl Method Whenever Possible
Some recipes are too complicated to make in simple 1-bowl. But there are plenty of recipes that do just fine as one-bowl mixes, especially quick breads, muffins and some cakes.
The trick: Mix your dry ingredients in a bowl, make a well in center, pour in wet ingredients and stir gently until just combined. This is solid for recipes that don’t require the creaming method (whipping up butter and sugar together).
One bowl is one thing to wash. The result: Over time, it saves hours of cleanup. Look at your recipe and determine whether the multitasking, multi-bowl assembly really is necessary or just traditional.
How to Clean Efficiently (So You Don’t Waste Time)
Clean As You Go
The quickest cleanup is the one that happens while you are baking, not after. While you’re waiting for something to mix or bake, scrub those bowls and utensils you’ve already used. When your baking comes out of the oven, you are pretty much cleaned.
Work over a large bowl or container of hot, soapy water on your counter; set the bowl alongside and toss biodegradable scraps into it to keep your station clean. As you go, throw in dirty measuring spoons, spatulas and small bowls. They will sit and soak while you bake, which will make them easier to wash afterward.
Immediately wipe up counters if something spills. Fresh flour and sugar are much easier to clean than hardened clumps of one or the other.
When you are working with flour, line your work surface with a large piece of parchment paper or a silicone mat. When you are finished, simply roll up the paper with all the mess inside of it and throw it away. Your counter stays clean.
✨ Want bakery-style results? Explore 5 Secrets to Fluffy and Soft Bakes — your desserts will thank you!
Baking Time Management Chart
Here’s a handy guide to how these tricks save time when you bake your average dish:
| Baking Task | Traditional Method | Time-Saving Method | Minutes Saved |
|---|---|---|---|
| Ingredient prep | Measure as you go | Mise en place + scale | 5-7 minutes |
| Softening butter | Wait 2 hours | Cut cubes or warm glass method | 100+ minutes |
| Room temp eggs | Wait 1-2 hours | Warm water bath | 50+ minutes |
| Pan preparation | Grease and flour | Pre-cut parchment | 2-3 minutes per pan |
| Dough rising | Natural rise | Warm oven environment | 30-40 min |
| Cleanup | After baking | Clean as you go | 15-20 min |
How much time does this save you each bake session: 30–60 minutes or more
Frequently Asked Questions
Is it O.K. to freeze every kind of cookie dough?
Many types of cookie dough freeze beautifully, from sugar cookies and oatmeal cookies to chocolate chip. Except for those very delicate meringue-like cookies, or ones that rely heavily on egg whites. Dough can be frozen up to three months in airtight containers or freezer bags. Write the baking temperature and time on a label for easy reference.
How can I tell if my butter is softened correctly?
It should be flexible under pressure, but not squishy or hard. Should be somewhere about 65-67°F (18-19°C). If your finger sinks all the way down, or if it looks greasy, that means it’s too soft. If it’s still cold and hard to press, give it more time. And the correct texture should feel like soft clay.
Does using a kitchen scale actually improve my baking?
Absolutely. Baking is chemistry, and when you measure with a scale, the equation is always in balance. Depending on how you scoop it, a cup of flour can weigh between 120 and 150 grams. This deviation can lead to dry, mealy cookies or heavy leaden cakes. A scale takes the guesswork away while guaranteeing your recipes turn out the same each time.
How are baking ingredients best organized?
Keep what you use often at eye level in clear, airtight containers. Name everything and signal its expiration date. Store similar items together (yeast in one place, sugars together). Use lazy Susans for small items such as extracts and food coloring. The idea is to see all that you have and to grab it as fast as you can without rummaging in the cabinetry.
How long can I keep pre-made dry ingredient mixes?
Correctly stored dry mixes will last 2-3 months if kept in airtight containers and stored in a cool, dry place. The main limiting factor is the rise of your baking powder or soda, which can lose its potency. Date cans you make and use the oldest ones first. If your cookies and cakes are not getting as puffy, decadent or tender as they should be, it is possible that your leavening agents have spoiled.
Is it OK to use heat to make yeast rise faster?
Yes, if you apply gentle heat. Yeast prospers in a warm atmosphere at 75-85°F (24-29°C). Yeast dies over 140°F (60°C) warmth. The warm oven trick is successful because the oven itself isn’t even on — it’s just dumping any remaining heat it has stored. Always check the temperature by putting your hand in before you place dough inside. You want it to be the temperature of warm bath water (not hot!).
Can I make cake mix ahead of time?
But most cake batters are not keepers, as the leavening starts to work once it is hydrated by liquid. But you can pre-measure dry and wet separately, keep them in the fridge until you’re ready to mix and bake. To save time, bake cakes all the way through, package them up well and freeze for up to three months. Thaw and frost when needed.
Your New Baking Schedule Begins Today
Baking doesn’t have to take all day. Take these nine time-saving tips to ratchet down your prep work, so you can spend more time getting creative with your cooking and eating the delicious meals that result. Pick just 2 or 3 things to try during your next baking session. You’ll immediately notice the difference.
So the best part of all this is that they will become second nature with enough practice! One day, you’ll just naturally prep before starting a project, measure with your scale without even having to think about it and clean as you go. They add up after a while and save you hours each month.
So, keep in mind the point is not to whisk your way through baking; it’s to cut out the time-wasters that you don’t really need to focus on what matters. And whether that means nailing down your decorating skills, trying new recipes or hustling to get those cookies in the oven by the time your kids drag themselves back from school, efficiency equals freedom.
Break out that apron, blast up those oven jets and get to putting some of these tricks into play. Your future self (eating a new cookie, not scrubbing baking sheets) will thank you. Happy baking!


Trying out 735betfun for a night of entertainment. Hopefully the name delivers on the fun part! Lets test the bet! See for yourself 735betfun