
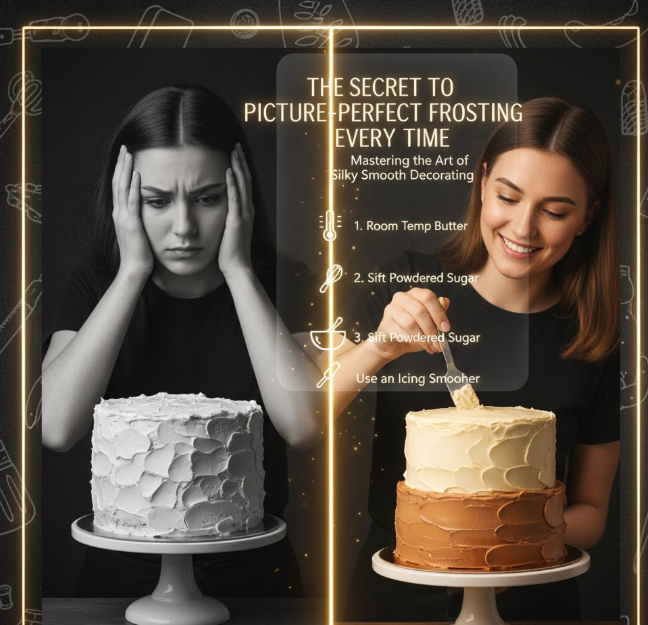
You’ve toiled for hours over the perfect cake. The layers are golden, the crumb is moist, and the scent wafts through your kitchen. But then it’s time for the moment of truth: frosting. Your spatula seems to slide so easily across the top, but then, rather than a perfectly smooth finish, there are crumbs everywhere and splotchy patches and cracks — a look that might be called more “rustic” than you’d like.
Sound familiar? You’re not alone. Frosting is where a lot of home bakers trip up, even if they are virtuosos when it comes to that cellophane-wrapped break-and-bake dough. The good news? There’s no magic to making bakery-quality frosting, nor do you need years of experience. Goodness knows it’s not about knowing all the tricks, temperatures and techniques that professionals use on a daily basis.
This guide will help you tackle everything that you need in order to turn judgy frosting into success! Whether you’re planning a birthday party, a wedding shower or your weekend baking project just needs to look as good as it tastes, these are the tips that will help you achieve that smooth finish all the time.
Why People Can’t Frost Cupcakes
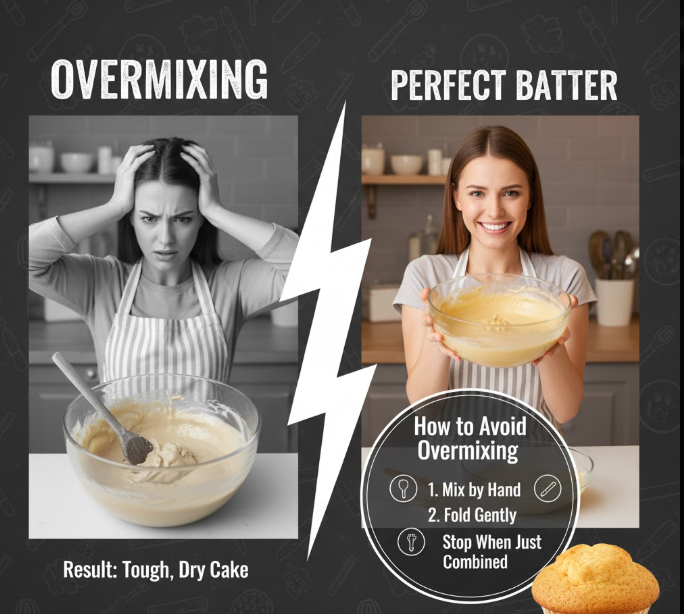
Before we get to how to fix it, let’s examine why your frosting is tanking in the first place. The three biggest causes of frosting fails have to do with temperature, consistency and rushing the process.
Temperature: Cakes that aren’t completely cooled before busting out the frosting will melt it upon contact. If your frosting is too cold, it tears the surface of the cake and leaves behind lumps. The real challenge is in getting both elements of the dish to be just right.
Consistency matters just as much. If the frosting is too thick, it will not evenly spread. Frosting that’s too loose slides off your cake. The quest for that sweet spot between easy-to-spread and maintains-its-shape requires some experimentation and just the right ratio.
Impatience is what ruins more cakes than anything else, at the end of the day. It’s a recipe for disaster to skip the crumb coat, forget to let layers settle or try to frost straight out of the oven. Professional bakers will tell you that patience is not optional, it’s the secret ingredient.
Preparing Your Cake for Frosting Success
The making of a beautiful frosting begins before you’ve even opened your bowl of frosting. Your cake has a proper baking prep, and this is the step that makes your finished product look homemade vs. bakery-worthy.
Cool Completely, No Exceptions
This rule has zero flexibility. Your cake needs to be all the way cool before any frosting touches it. If the inside still maintains warmth, room temperature isn’t good enough. Place your hand lightly on the cake. If there’s any warmth at all, wait longer.
It’s also generally smart for bakers to wait at least two hours after pulling cakes out of the oven. For thicker layers or denser cakes, opt for three to four hours. If you’re short on time, refrigerate the layers for 30-45 minutes, but make sure they don’t dry out: Wrap them loosely in plastic wrap.
Level Your Layers Like a Pro
Cakes naturally dome during baking. Those rounded tops mean unstable layers that incline, slide and prevent even frosting. For stacking, you need at least a flat surface.
Any serrated knife should do the trick, but a cake leveler takes all of the guesswork out of it. Position your leveler to the height you want to cut and gently saw through your cake with a light continuous motion. Keep those scraps — they are fantastic cake pops or trifle layers.
The Crumb Coat Revolution
This method distinguishes between amateur and professional results. A crumb coat is a thin layer of frosting that seals in the crumbs and provides an even surface for your final coat.
Here’s the correct way to do it: Start with an extremely thin layer of frosting all over your cake. It doesn’t have to be perfect — you want to see cake peeking through in some spots. Not beauty yet, but rather to catch the loose crumbs.
It’s all smoothed out now, so pop your crumb-coated cake into the fridge to chill for 15-30 minutes until the frosting is set. This forms a sealed surface which allows you to coat your final frosting without pulling up crumbs in the finish.
Temperature Control: The Game-Changing Factor
Professional bakers fixate on temperature, because they know it’s the difference between a successful product and the waste bin. It’s the thing that if you get it right, everything else falls into place — at least 80% of common frosting problems will suddenly be off your radar.
Frosting Temperature Sweet Spots
Varieties of frostings require different temperatures for the easiest spreading:
| Frosting Type | Optimum Temperature | Texture |
|---|---|---|
| Buttercream | 68-72°F | Soft but stands stiff |
| Cream Cheese | 65-68°F | Spreadable/not runny |
| Ganache (coating) | 85-90°F | Pourable, but hardened |
| Swiss Meringue | 70-75°F | Silky/smooth |
| Royal Icing | Room temp | Thick enough to pipe |
If your frosting is too cold, allow it to warm up at room temperature for 10-15 minutes. Stir it to see if it’s thickening up. Too warm? Pop it in the fridge for 5-10 minutes, then give it a stir and check again.
Room Temperature Matters for Everything
Your butter, your cream cheese, your eggs (if you’re using them), even the temperature of your mixing bowl — it all makes a difference in what you end up with. Butter straight from the fridge will produce lumpy frosting that never really evens out. Butter that is too warm would cause the frosting to be so runny that it wouldn’t hold its shape.
Set butter on the counter about 45-60 minutes before making frosting. There should be a slight indentation when pressed, but the butter should still maintain its shape. It’s the ideal state for making smooth, pipeable frosting.
Mixing Styles for Silky-Smooth Frosting
How you mix your frosting is as important to its texture as what’s in it. Professional bakers mix in certain ways to get that cloud-like effect.
Start Slow, Finish Fast
Mix your ingredients together on the lowest setting for your mixer when you first combine them. That way sugar clouds don’t cover your kitchen and ingredients can incorporate slowly without whipping in too much air.
Once incorporated, turn the speed to medium-high. This is the magic moment — you’re beating air into mixture, making that lovely light texture that everyone loves. Scrape the frosting bowl down, then beat for an additional 3-5 minutes or until the frosting is visibly lighter and has expanded in volume.
The Paddle Attachment Secret
Home bakers just don’t get the attachment thing; they use the whisk for everything. Professional bakers think differently. The paddle attachment results in frosting with less air bubbles and a creamier, smoother overall texture.
The whisk introduces more air, and that more air may sound good, but those little air pockets typically appear on your smooth finish like tiny blemishes. Ingredients come together in the paddle with the perfect amount of air for lift without any bubbling issues.
On-the-Fly Resolution of Consistency Issues
Frosting too thick? Then add liquid a teaspoon at a time — you could use milk, cream or even water. Stir well after each addition until you get the best consistency!
Too thin? Stir in powdered sugar one tablespoon at a time, or chill 10-15 minutes until firm. If you have buttercream that’s breaking apart, you have the wrong temperature — usually too warm. Refrigerate briefly, then re-whip.
The Best Tools For Perfect Frosting
You don’t need a pro kitchen packed with shiny, expensive gadgets, but still: There are certain tools that can make the difference between struggling and succeeding.
The Essential Toolkit
Offset Spatula: This is essential for frosting cakes. Its angled shape allows you to spread frosting smoothly without your knuckles bumping into the cake. Most jobs can be handled with a 6- to 8-inch offset spatula.
Turntable: A turntable revolutionizes cake decorating. By spinning your cake and holding a steady spatula, you get close to perfect, even coverage in one shot without having a ton of frosting on the cake that is now getting pushed from side to side. Decent turntables can be had for less than $20.
Bench Scraper (also known as an icing smoother): These are used to achieve the super smooth sides of pro cakes you see! Use it to keep it stable as you spin the cake around, and the frosting smooths itself gloriously.
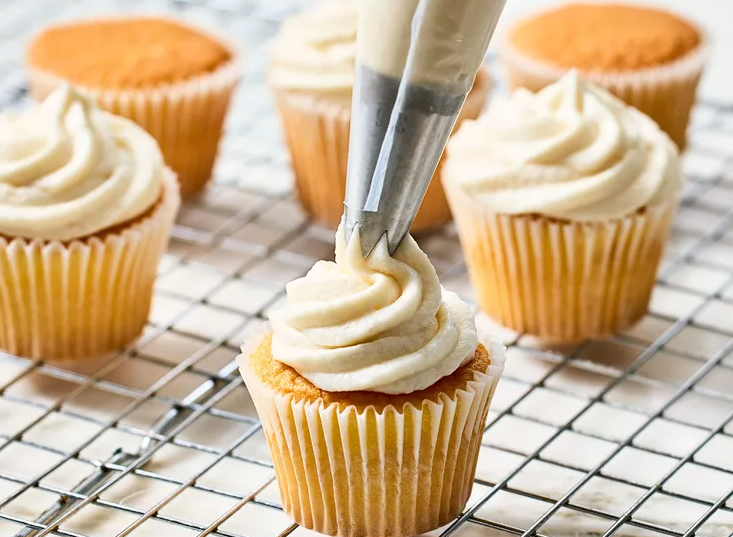
Piping Bags and Tips
If you’d like to decorate, splurge on a few simple piping tips. A large round tip, a star tip and a petal tip will cover just about anything you want to decorate. Disposable piping bags are an easy way to keep cleanup quick and painless, but reusable bags have a leg up in terms of that sustainability factor.
Half fill your piping bag so that you have control. Twist the top to force frosting toward the tip, eliminating air bubbles that result in sputtering and erratic flow.
The Secret to Perfect Frosting, Every Time
Let’s now combine it all together into a foolproof method that guarantees perfect results every time.
Step 1: Prepare Your Workspace
Clear your counter and have all tools in arm’s reach. Your turntable should be in a convenient location. Have a wet cloth at the ready to clean off your spatula in between swaths.
Step 2: Apply the Crumb Coat
Place your first cake layer on the turntable. Spoon a generous helping of frosting on the center. Then use your offset spatula to spread it toward the edges, making an even layer that is about ¼ inch thick.
Top with your next layer, pressing gently to adhere. Copy the frosting procedure for the succeeding layers. Spread a thin layer of frosting all around the outside of the cake once it is piled up. Don’t worry about perfection here.
Chill in the refrigerator for 20-30 minutes until the crumb coat is firm to the touch.
Step 3: Apply the Final Coat
Take your cake out from the refrigerator. Dollop the frosting on top. With your offset spatula, push the frosting from the middle outward so that excess falls down the sides.
Once the top is covered, use your spatula to move the frosting down around the sides. Dollop on remaining frosting, or as much as needed to provide complete coverage. It will be messy at this point (which is O.K.).
Step 4: Smooth to Perfection
Hold your offset spatula or bench scraper at a 45-degree angle to the side of the cake. Just spin the turntable slowly while holding the scraper steady. It’s the spinning motion that does the smoothing.
Repeat several times, clearing out your scraper as you go. You’ll notice the sides are smoothing out more and more with each pass. For the top, drag your scraper flat across the surface, sweeping from the edges toward the center as you rotate the turntable.
Varieties of Frosting With Particular Needs
All frostings do not respond the same way. Knowing the eccentricities of each type helps you to adjust your tactic.
American Buttercream
This old-fashioned frosting’s a crowd-pleaser if ever there was one. It’s built from butter and powdered sugar, so it is sturdy at room temperature and withstands heat pretty well. Its primary drawback is sweetness — it can be cloyingly sweet due to high sugar levels.
Make the smoothest American buttercream by sifting your powdered sugar before incorporating it. This does away with lumps that never quite dissolve. Beat for minimum 5 minutes until it becomes light and fluffy.
Swiss Meringue Buttercream
This silky frosting is less sweet than American buttercream and feels luxurious in the mouth. It involves cooking egg whites and sugar over a double boiler, then whipping until cool before adding butter.
The secret to getting Swiss meringue buttercream right is to have patience when adding the butter. Add it one tablespoon at a time and beat nonstop. The mixture may appear curdled or broken — just keep beating. After 5-10 minutes it will turn into a silky perfect frosting.
For more detailed instructions on Swiss meringue buttercream, check out this comprehensive guide.
Cream Cheese Frosting
Ideal for carrot cakes and red velvet, cream cheese frosting’s tangy quality pairs well with sweet cakes. Being less stable than buttercream, it can turn liquid-y if overbeaten or too warm.
Use full-fat cream cheese for best results, as reduced-fat versions don’t hold together as well. Whip the cream cheese until smooth then add butter, after that slowly beat in powdered sugar. And don’t overbeat once everything is combined, or you’ll lose the structure of the frosting.
Ganache
Chocolate ganache offers a glossy, professional look. For a spreading consistency, use 1 part chocolate to 1 part cream. Allow it to cool until it has the thickness of pudding before using.
Pour ganache over your crumb-coated cake, allowing it to run gently down the sides. Gently use an offset spatula to help fill in coverage. Work fast, ganache will firm up as it cools.
Troubleshooting Common Frosting Disasters
Problems can happen even with perfectly good technique. Here’s how to troubleshoot the most common problems.
Crumbs in Your Final Coat
This occurs when you skip the crumb coat, or let it firm up too little. If there are any crumbs at all in your final frosting, don’t attempt to spread them away — you will just make it worse. Remove that section, cover with new frosting and smooth again.
Uneven Layers or Leaning Cake
This is a sign that your cake did not bake with level layers or you didn’t frost the layers evenly. Since stability is key, between-layer frosting should be a fully ¼” thick layer covering the entire layer. Measure your layers before and after stacking with a ruler or measuring tape.
Frosting That Won’t Stick
Typically, this occurs from condensation on a cold cake. If you’ve refrigerated your layers, give them 10-15 minutes at room temp before frosting. Take a paper towel and blot away any moisture from the surface.
Air Bubbles and Holes
These are the result of overmixing, or air getting trapped in your frosting. Once you’ve mixed your frosting, let it sit for 5 minutes, and then do a light hand stir to release air bubbles. As you spread, use enough pressure to make frosting and cake flush.
Advanced Techniques for Show-Stopping Results
Once you’ve got the basics down, these pro-level tricks will elevate your cakes.
The Hot Water Smoothing Method
For super-smooth sides, attempt this bakery trick: After you’ve applied your finishing coat of frosting, dip your bench scraper in hot water, then wipe dry and run it around your cake. The brief warmth will help the frosting spread out flat like glass. Act fast and clean off your scraper after each pass.
Creating Texture and Patterns
Smooth frosting is lovely, but textured finishes are visually interesting. You can drag the back of a spoon into swirls, or a fork into rustic ridges, or an offset spatula to make deliberate swoops and peaks.
You can divide your frosting and tint it to an ombré effect. Darker color should be placed at the bottom and continue using incrementally lighter colors towards the top. Blend any place where colors touch, using your offset spatula.
Piping Beautiful Borders
Borders cover up imperfections where the cake meets your serving plate, and add a professional, polished appearance. A simple shell border uses a star tip and rocking action—squeeze, stop pressure while lifting up slightly, then come back down again to overlap the first shell.
Pipe in an S shape in this manner for a rope border. Try it on parchment paper before you take the plunge to do it on your cake.
Storage and Transportation Tips
Making perfect frosting is just half the battle — you’ve gotta keep it looking fresh until it’s ready to serve.
How to Store Frosted Cakes
Buttercream-frosted cakes can be kept at room temperature for 2-3 days if your kitchen isn’t too hot (no warmer than about 70°F). For longer or in warmer conditions, keep refrigerated.
If you’re refrigerating, allow your frosted cake to sit in the fridge uncovered for 15 minutes to set the frosting. Then drape the cake with plastic wrap or gently set it in a cake carrier. When the frosting is set, the wrap won’t stick to your beautiful finish!
Cream cheese frosted and ganache glazed cakes should be refrigerated. Let them sit at room temperature for 1-2 hours before serving, this is the best way to enjoy them.
Transporting Without Disaster
To travel with your cake safely, chill it thoroughly — cold frosting is a lot more stable. Place your cake on a non-slip mat or damp paper towel in something sturdy. Drive on a level surface and take care not to make any sudden stops.
For extended travel, freeze your cake solid and transport it frozen. It’ll defrost slowly, and the frosting will be practically perfect. This is how commercial bakeries transport wedding cakes without fail.
Frequently Asked Questions
May I prepare the frosting in advance?
Absolutely! Most frostings keep well in the refrigerator and can be stored for as long as a week. If using refrigerated frosting, bring it to room temperature and beat for a little bit again until it reaches its original texture. Buttercream can also be frozen for 3 months.
Why is my buttercream grainy?
Graininess comes from undissolved sugar. Just use well-softened (not cold or melted) butter, and beat it until it whips up—it will take at least 5 minutes. If it remains grainy, add 1 tablespoon heavy cream and beat for an additional 2-3 minutes.
How much frosting do I need to cover a cake?
3-4 cups of frosting for an 8″ two layer cake with filling and crumb coat plus final coat. A three-layer cake will use 4-5 cups. Sheet cakes require 3-4 cups. Make even more than that, so you don’t run out halfway through decorating.
Is there any way to ‘save’ frosting once it has separated?
Yes! If your buttercream looks curdled or broken, there is typically an issue with the temperature. If too warm, chill for 10 minutes and then beat. If it feels too cold, let it warm up just a bit, and then beat on high speed for 3 to 5 minutes until it does come together.
How is the best way to color frosting?
For coloring, use gel food dyes, not liquid — it won’t thin your frosting. Using a toothpick, add color little by little to achieve the desired shade, mixing well after each addition. Keep in mind, colors tend to deepen with time, so make your frosting a shade or two lighter than what you are aiming for.
How can I keep my cake from sliding around while frosting?
Put a small amount of frosting on your cake board or serving plate before laying down your first layer. This acts as glue. For added security, put a long wooden skewer through the middle of all layers—just remember to take this out before serving.
Your Path to Frosting Confidence
You don’t need to own professional-level equipment or have years of experience. It’s a matter of understanding how frosting works, and taking the time to do it right.
Temperature control keeps everything workable. Preparation prevents problems. Having the right tool makes the process easier. Practice builds muscle memory, which is what turns techniques into second nature.
Begin with basic cakes and simple buttercream. Learn the crumb coat and final coat technique on a small 6″ cake first, then apply your learning to larger jobs. Every cake you frost builds your skill and confidence.
You know what? Professional bakers have frosting failures too. The difference is that they have learned to fix problems on the fly and learned to let go of a need for perfection; striving toward it rather than assuming you can achieve it. Your homemade cake doesn’t have to look identically styled to a bakery creation — it has to taste phenomenal and reflect the love and care you put into it.
With these skills in your repertoire, you can go on to make cakes that not only taste great, but are impressive to look at too. The secret behind beautiful frosting is not really a secret at all, just some tips and tricks that come with knowledge and practice. Your next cake is going to be a showstopper, and you officially have all the tools.