

This is what it looks like: you combine flour, water and a small packet of yeast, let it sit for a few hours. Upon returning, your dough has doubled in size, is full of air bubbles and smells wonderfully alive. That’s not magic — it’s the yeast doing its microscopic trick. For thousands of years, bakers have counted on these tiny organisms to turn simple ingredients into fluffy bread and golden pizza crusts and sweet cinnamon rolls. But what is yeast, exactly, and how does it do its miracles in your kitchen?
Yeast is more than a mere pantry ingredient. It is alive, a living organism that breathes and eats and burps out the gases that make your baked goodies rise. Whether you’re baking your first loaf of bread or perfecting your grandmother’s dinner roll recipe, understanding how yeast works will revolutionize the way you bake. This article dives deep into the science and secrets of yeast, covering everything from the variations of yeast you can buy at your local store to what to do when things don’t go according to plan.
What Exactly Is Yeast?
Yeast is a fungus, and before you panic, see here: mushrooms are also fungi! Saccharomyces cerevisiae (literally means sugar eating fungus) is the name of the yeast that is used in baking. They are single-celled creatures so tiny that you’d have to peer through a microscope just to see one lone yeast from the pack. In reality, one teaspoon of active dry yeast is thousands of millions these miniature assistants.
Yeast, in contrast to bacteria, are a bit more advanced for being eukaryotic and have their own nucleus and organelles. They have existed for millions of years and naturally populate the skins of fruits — even humans come into contact with them in soil and as they float around the air we breathe. The ancient Egyptians were the ones to find out that if you leave dough sitting around overnight, it will rise — they just didn’t know why. Unbeknownst to them, they were trapping wild yeast from the air; that’s still how sourdough starters operate today.
Yeast is the leaven that works in your kitchen. Leavening is the process of lifting a dough and introducing air or gas into it. As the yeast eats up the sugars in your dough, it excretes carbon dioxide gas and alcohol. The carbon dioxide becomes snared in the gluten network of the dough, and those lovely air pockets are formed to prevent bread from becoming denser than flat cardboard.
The Science Behind Yeast’s Rising Power
The process that makes bread rise is fermentation. When you put yeast to flour and water, you’re creating the ideal conditions for a reaction. Here is what happens, step by step:
To start, the yeast cells wake when they meet heat and water. If you were using dried yeast, the cells were dormant — essentially asleep — until you activated them. Fresh yeast is live, and therefore ready to go. When the yeast cells wake up, they become a bit like foragers.
There are starches in your dough’s flour, or long chains of sugar molecules. Your dough also contains enzymes that work to break these starches down into simple sugars — glucose and maltose. The sugar gets absorbed by the yeast cells and the yeast utilize it for energy. As they digest their sugar, they make carbon dioxide gas and ethyl alcohol through a process called glycolysis.
The carbon dioxide gas naturally wants to escape, but the gluten proteins in the flour — which develop when you mix flour with water — make a stretchy network that traps those bubbles of gas. That’s why you knead bread dough — you’re building up the gluten structure so that it can get all of those bubbles to huddle together and rise. The bubbles grow in size, the more carbon dioxide that is made and therefore the larger your dough grows.
The alcohol created during fermentation largely cooks off during baking, but it also plays a role in the complex flavor of bread. Which is why fresh-baked bread smells so distinctively, slightly sweet. The longer you have to allow dough to ferment, the more complex flavors emerge — that’s why slow-rise breads usually taste better than fast ones.
Different Types of Baking Yeast
All yeast is not created equal. Grocery stores stock a variety of them, and getting the right one for any given recipe can be the difference between an OK result and a cool one.
Active Dry Yeast
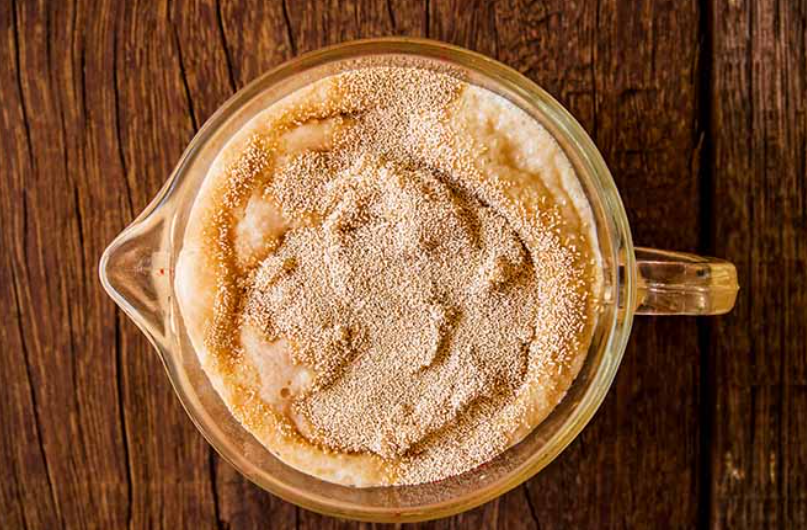
This is likely the most common type you’ll find in stores. Active dry yeast is sold in small packets or jars and is composed of granules, which are beige. The yeast cells have been desiccated and are in a dormant state. Before using active dry yeast, most bakers dissolve it in warm water (between 105°F and 115°F) to which a pinch of sugar has been added. This process, called proofing, activates the yeast and tells you it’s still alive — you should see bubbles and foam appear within about 10 minutes.
Active dry yeast has a longer shelf life than fresh yeast and does not require refrigeration unless opened. Store it in the refrigerator after you open a jar for a longer shelf life. Each package holds about 2¼ teaspoons, which is enough for a standard loaf of bread.
Instant Yeast (Also Known as Rapid-Rise or Bread Machine Yeast)
Instant yeast has more fine granules than active dry yeast and does not need to be dissolved in water first. You can stir it directly into the dry ingredients, which saves time. That’s because the particles are smaller and yeast cells can draw in moisture faster than with active dry.
For these reasons, many professional bakers rely on instant yeast. It’s more forgiving of temperature swings and so your dough is less likely to flop if conditions aren’t perfect. Instant yeast has the brawn to tackle both short rises and long, cold fermentation in the fridge.
Fresh Yeast (Also Known as Cake Yeast or Compressed Yeast)
This yeast has a soft, crumbly block appearance and creamy beige color. (That’s the one many artisan bakeries use for superior flavor and texture.) Fresh yeast is already alive and active, so you don’t have to dissolve it or proof it first — just crumble it into your dough.
The disadvantage is that fresh yeast is perishable. It keeps for only a few weeks in the refrigerator and cannot be kept at room temperature. It can be frozen for as long as six months, although once the ice has melted it must be used shortly thereafter. Fresh yeast is a bit harder to come by at the regular grocery store, but many specialty baking shops will stock it.
Nutritional Yeast
And since we’re on the topic of yeast varieties, I should point out what nutritional yeast ISN’T used for: baking. Nutritional yeast has been killed through heating, so none of the cells are living and able to ferment. It is a cheese-flavored seasoning for popcorn or pasta, not a leavening agent that makes bread rise. Don’t confuse the two!
How Temperature Affects Yeast Activity
Yeast is actually quite finicky when it comes to temperature. If it’s too cold, it doesn’t work very well. Too hot, and you’ll kill it. Baking is all about finding that sweet spot.
| Temperature Range | Yeast Activity | What Happens |
|---|---|---|
| Below 50°F | Dormant | Yeast essentially hibernates and produces almost no gas |
| 50-70°F | Slow fermentation | Yeast works slowly; good for overnight rises in refrigerator |
| 70-80°F | Optimal activity | Yeast works at perfect speed; most recipes target this range |
| 80-90°F | Very active | Yeast works quickly but may produce less flavor |
| 90-110°F | Increasingly stressed | Yeast still functions but begins to suffer |
| Above 120°F | Death | Yeast cells die and cannot be revived |
The yeast fermentation temperature is between 75°F to 80°F, and at this rate, the yeast gas (bubble) comes out well and it gets a good flavor. Most kitchens will naturally be somewhere in this range, which is why many recipes instruct you to let dough rise “in a warm place.”
If your kitchen is cold, one way to create a warm environment is to turn on your oven for just 1 minute and then turn it off, placing the dough inside. And the after-heat is usually just right. Some people additionally sit dough near (not on) a heating vent or atop the refrigerator where the motor hum of this particular appliance generates gentle warmth.
Water temperature also matters, particularly when you’re awakening dry yeast. Use water that feels warm but not hot when you touch it — about 105-110°F is ideal. If the water is too cold, the yeast will be slow to activate. If it’s too hot, you’ll kill the yeast before it has a chance to start working.
Ingredients Used in Yeast Bread
Yeast doesn’t work alone. Each ingredient in bread dough has a distinct purpose for the rising.
Flour provides the structure. Once water meets the proteins in flour, they make gluten — the stretchy strands that support all those bubbles. Bread flour has more protein than all-purpose, therefore it creates a stronger gluten network—driving up the rise of our bread and resulting in a chewier crumb. Whole wheat flour adds flavor as well as nutrition to your bread, but produces denser loaves because the pieces of bran cut through gluten strands.
Water activates the yeast and also proteins in flour. It is what controls the consistency of your dough as well. More water makes a stickier, wetter dough which forms larger air holes (like in the crumb of ciabatta bread). A stiffer dough is easier to shape.
Sugar is food for the yeast, a quick-hit source in addition to all the flour’s starches. But you actually don’t have to have sugar for yeast to work — the flour itself has plenty of carbohydrates, so even a bread made from nothing more than water, flour and salt will rise. Sugar tenderizes bread, too, and it also makes the crust brown. Excessive sugar (more than a quarter-cupful per loaf) can actually retard yeast because the high concentration of sugar draws water away from the yeast cells.
Salt does three important jobs. For one, it acts as a yeast regulator: It keeps the activity of yeast in check, slowing it down to just the right pace and preventing over-fermentation. Second, it hydrates the gluten network. Third, it provides flavor — bread without salt is dull beyond belief. But never allow salt to come into contact directly with yeast because concentrated salt can kill yeast cells.
Fat (butter, oil or eggs) is what tenderizes bread and helps keep it fresh longer. Fat surrounds some of the gluten strands, resulting in softer, less chewy bread. Rich breads, such as brioche, are literally loaded with butter and eggs – that’s why they’re so soft and cakey.

The Rising Process Explained
Most recipes for yeast bread direct you to make two rises, and each does a separate job.
First Rise (Bulk Fermentation)
Once you have mixed and kneaded your dough, you allow it to rise until it has doubled in size. This typically takes 1-2 hours at ambient temperature. This is when the yeast goes nuts, creating bubbles and flavor. The gluten network also relaxes and starts to become more extensible, making shaping easier later.
The first rise is finished when you poke the dough with your finger and the indentation remains this is called the poke test. The dough should not spring back immediately. If it collapses when you poke it, you’ve let the dough over-proof and by this stage there’s little food left for the yeast to consume.
Punching Down
You’ll “punch down” the dough (a term that cracks me up every time I write it) after the first rise, by which I mean gently pressing it and squishing some of its gas out. This has a few roles: it moves the yeast around to new food sources, lets some of the carbon dioxide build-up escape, and evens out the temperature of your dough. You don’t need to be rough — you’re not killing the dough, just deflating it.
Shaping
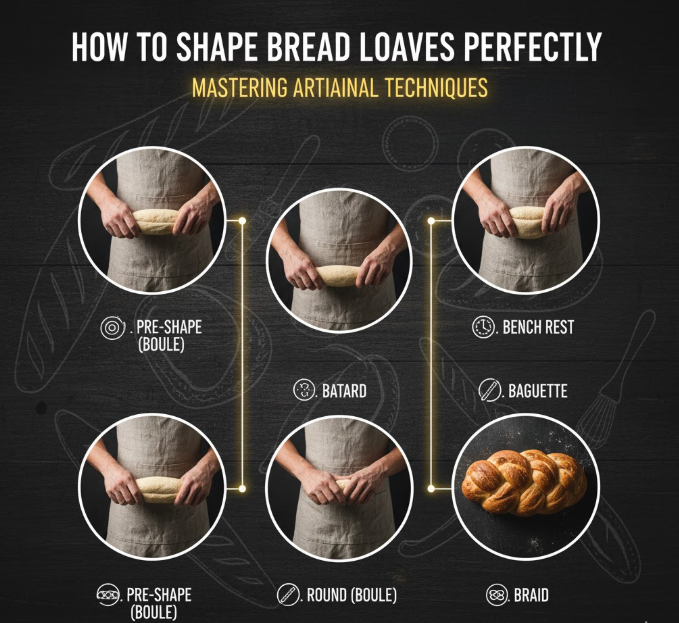
Next, you form your dough into loaves, rolls or whatever shape it requires. Shaping produces a surface tension which helps the bread both keep its shape and rise upward as it bakes.
Second Rise (Final Proof)
The dough rises again after the shaping. This step-up fermentation is typically much shorter — 30 minutes to an hour as opposed to six hours to overnight — since the yeast are already up and running, and the volume of dough is smaller. The second rise evolves the final texture of the bread and gives its gluten one more chance to relax.
Don’t let the second rise get away from you. Over-proofed dough bakes up flatter and spreads out in the oven because the air that was trapped in it can no longer hold its shape. Under-proofed bread will be dense, since the yeast hasn’t produced enough gas.
Why Your Bread Doesn’t Rise (And How to Fix It)
Stubborn dough that just won’t rise can trip up even experienced bakers. Here are the most typical issues and fixes:
Dead Yeast
It is the single cause of flat bread. Yeast does not have a long shelf life, even if kept sealed. Always check the expiration date, and if you’re in doubt, proof your yeast before adding it to dough. Combine yeast with some warm water and a little sugar, and let it sit for ten minutes. If you’ve got nothing but flour water left— no froth, no bubbles —than your yeast is dead and needs replacing.
Wrong Water Temperature
Water that’s too hot kills the yeast; water that’s too cold lets it lie dormant. Use a thermometer if you’re not sure, or check the water on your wrist: It should feel warm but not hot, like baby-bathwater.
Too Much Salt
Salt is essential but toxic to yeast at high concentration. Follow recipe measurements closely, and never get salt directly on the yeast when you mix ingredients.
Not Enough Time
Dough takes longer to rise in a cold kitchen. Be patient. You can’t make yeast go any faster by cranking the heat up too high — you’ll only kill it. If your dough takes an extra hour, give it that time.
Old Flour
Flour has enzymes in it to convert some of the starches into sugars that yeast eats. As flour gets old, these enzymes lose their kick. Very old flour (1 year+) might not be supporting good yeast activity.
Over-Kneading
It’s difficult to knead dough too much by hand, but it’s easy with a stand mixer. Gluten in over-kneaded dough is too damaged to hold all this gas efficiently. The dough appears broken, and when you start to gather it together, it doesn’t form a cohesive ball easily.
Quick Breads vs. Yeast Breads: What Are They?
In fact, you may have even realized that not all baked goods are made with yeast. Muffins, biscuits, pancakes, and countless other foods are leavened in different ways.
Quick breads typically rely on chemical leaveners, such as baking powder or baking soda. These ingredients react with liquid to release carbon dioxide gas right away, so there’s no need for you to wait on dough to rise. You can mix a batch of quick bread batter and bake it right away; hence, the “quick” thing. The texture is generally cakier and less chewy and stretchy.
There’s also none of the fermentation time involved in yeast breads, and that’s an entirely different beast when it comes to texture and flavor. The gluten development from kneading and slow fermentation lead to chewy breads with complex flavor profiles and irregular air holes. Yeast breads also keep longer by virtue of the fact that their fermentation produces natural preservatives.
Both techniques have their place in baking. Neither is superior — they are simply different tools for different outcomes.
Sourdough: Wild Yeast Baking
Before they could purchase commercial yeast, all bread was made with wild yeast that bakers had captured from the environment. That is how sourdough operates, and it is in the midst of a huge resurgence among home bakers.
A sourdough starter is a solution of flour and water that’s allowed to ferment. Wild yeast that’s floating around in the air, flour and your hands colonizes the mixture along with beneficial bacteria. The bacteria produce lactic and acetic acids, which lend sourdough its signature tangy flavor.
It’s a commitment to keep a sourdough starter alive. You feed it regularly, by adding fresh flour and water to give the wild yeast and bacteria new food. Some bakers treat their starters like pets, and name them — and keep them alive for years or even decades. A few of those starters have been handed down through generations.
Sourdough baking is also a longer process than standard commercial yeast breads because wild yeast acts slower. But there’s a large contingent of people who argue sourdough makes healthier, better-tasting bread. The long fermentation processes break down some of the compounds in wheat that are hard for some people to digest.
Learn more about sourdough bread making techniques and starter maintenance from expert bakers.
Useful Tips for the Successful Baking of Yeast Goods
Now that we’ve covered all this science, how about some practical techniques that will better your bread every time you start a new loaf?
Measure carefully: Baking is chemistry, and exact measurements count. Ideally weigh flour on a kitchen scale, as scooping flour with a measuring cup compacts it in the cup and gives you too much.
Test your yeast: Always proof dry yeast if you are in doubt of its age. Better to waste 10 minutes now, and avoid hours of futile effort in bread that won’t rise.
Control your environment: Room temperature is everything in baking. That means that, if your kitchen is 65 degrees F, your rise time will be significantly longer than if it’s 75 degrees F. Manage expectations.
Don’t hurry: Good bread is a slow food. Although some recipes promise to be “one-hour bread,” the most flavorful results are from breads that ferment slowly, developing complex flavors.
Use the windowpane test: Stretch out a small portion of dough between your fingers once you’ve finished kneading. If you can stretch a piece of it really thin and see light through it without tearing, then your gluten is fully formed.
Watch, don’t clock: Times in recipes are approximations. And of course, due to countless variables, yours may rise more or less quickly. Get to know what perfect proofed dough looks and feels like, allowing rather than relying on timers.
Take notes: All kitchens are not created equal. Keep a journal of your baking, in which you jot down what worked and what didn’t. With practice, you’ll get to know your particular conditions pretty well.
Yeast Nutritional Value & Health Benefits
Aside from baking, though, yeast is also nutritious. Active yeast is a good source of B vitamins, such as B1 (thiamin), B2 (riboflavin), and B3 (niacin). It also has protein, minerals such as chromium and selenium, and beneficial enzymes.
Fermentation levels up bread’s nutritional accessibility. During fermentation, yeast and enzymes consume the phytic acid in wheat that can partially block mineral absorption. Breads that have undergone long fermentation are also lower on the glycemic index, so they raise blood sugar more slowly than quick breads.
For some people, yeast-fermented bread is easier to digest than quick breads. The fermentation pre-digests gluten and other proteins in wheat, so they’re less taxing on your digestive system. But this doesn’t mean that yeast bread is suitable for those with celiac disease or true gluten allergies.
Storage and Shelf Life
Yeast breads keep better than quick breads not just because they have less moisture but yeast fermentation creates natural preservatives. Yeast breads will generally keep at room temperature for 3-4 days when stored in a paper bag or bread box. Don’t use plastic bags for crusty breads, which will trap moisture and cause the crust to become soft and chewy.
For longer storage, freeze bread. Slice it before freezing, then you can peel off slices as desired. Wrapped well, bread can be frozen for three months. Defrost at room temperature or toast straight from the freezer.
Never refrigerate bread. The cool, dry climate in the refrigerator accelerates staling by a phenomenon known as retrogradation, in which starch molecules re-crystallize. Bread will go stale much quicker in the refrigerator than at room temperature.
Frequently Asked Questions
Can I use instant yeast instead of active dry yeast?
Yes, you can typically use instant yeast in place of active dry yeast, but not necessarily using a 1:1 ratio. The main difference is that instant yeast may be mixed straight into the dry ingredients, while active dry needs to be dissolved into water. The instant yeast just might get your dough to rise a tad more quickly, as well.
What does it mean when my yeast doesn’t foam during proofing?
Your yeast is probably dead. This occurs when the yeast is overaged, stored incorrectly, or dissolved in water that was too hot. Toss it and begin again with fresh yeast. Check expiry dates when using yeast.
What causes my bread to smell like booze?
Strong alcohol smell indicates over-fermentation. The yeast is starving and under stress, yielding more alcohol than it usually would. It’s a phenomenon that commonly occurs when dough has risen too long, or in an environment that is too warm. The bread is still fine to eat, though it will be less palatable and may have a slightly bitter or “yeasty” flavor.
Is there a way to use less yeast?
Yes! For centuries, many of the world’s bakers leavened their bread by various means and fermented their doughs over a long period of time (12-24 hours) using very little yeast (0.25 tsp). This creates amazing flavor but it requires forethought. You might play with reducing the yeast in your favorite recipe by half or three-quarters, then letting that dough rise in the fridge overnight.
Can I let my dough rise too long?
It depends on which rise. A one and a quarter increase, during the first rise, is usually all good. During the second proof, you need to be more cautious — overproofed dough can sink in the oven. Err on the side of slightly under-proofed rather than over.
Can I make a kneadless bread?
Yes! No-knead bread is super popular. These recipes rely on more water and a long fermentation time (12-18 hours) for gluten development without kneading. It has a wetter, looser crumb and you usually have to bake it in a covered pot to steam it.
Why does my bread turn out dense?
Bread density can be a result of dead yeast, too much flour or not enough kneading. Analyze everything in your process to see where it broke down.
Can I use beer or other things to make bread rise?
Naturally, beer already contains yeast — but the amount is generally not enough for leavening bread on its own. You’d still have to use baker’s yeast. But beer can also stand in as the liquid in bread recipes, imparting flavor and hydration.
Conclusion: The Science and Art of Mastering Yeast Baking
Yeast baking is at the intriguing crossroads of art and science. Yes, there are chemical reactions and biological processes taking place in your dough. But there is also instinct, patience and the sort of knowledge that comes only from practice — knowing by touch or smell when dough you’re working on is ready, understanding how your own particular kitchen and environment will affect (or impede) rising times, developing strategies over time that work for you.
The more you work with yeast, the better feel you will have for it. You’ll get to know when your dough needs another minute of kneading, see when it has risen to its peak and smell when the tastes have matured. These are skills that take time, and all bakers have failures. The flat, dense loaves will teach you more than the perfect ones ever could.
And keep in mind that humans have been baking bread for thousands of years — since long before we had instant-read thermometers, kitchen scales and scientifically formulated yeast packets. If ancient bakers could come up with beautiful bread from just flour, water and wild yeast they captured from the air, you can certainly make it happen — and do much better than that — in modern kitchens filled with gadgets. Have faith in the process and cut yourself slack — and don’t hesitate to get your hands in that dough. Before long, there you are pulling golden, savory perfection from your own oven with the confidence that only understanding exactly how the yeast got you there can supply.