
If you’ve ever baked cookies, cakes, or cupcakes that came out flat or dense instead of soft and fluffy — there’s a good chance the creaming step went wrong. 🧁
Creaming butter and sugar may sound simple, but it’s one of those little baking techniques that makes a huge difference in texture and flavor. It’s what helps your cakes rise beautifully and gives cookies that dreamy, melt-in-your-mouth bite.
In this guide, we’ll walk through the process step by step, talk about the science behind it, and share tips that’ll make your next batch of desserts taste like something straight out of a bakery.
Why Creaming Butter and Sugar Matters
Creaming isn’t just about mixing ingredients together — it’s actually a key part of how baked goods get their light, airy structure. When you beat butter and sugar, you’re not just combining them; you’re creating tiny pockets of air.
These air bubbles expand in the oven and give your baked goods a fluffy, delicate texture. Without this, your cake or cookies can turn heavy and dense.
Think of it like this — the creaming step is the foundation of your dessert’s texture. Do it right, and you’ve set yourself up for success. 🍰
What You’ll Need
Before diving in, gather everything you need. This helps you stay organized and ensures the butter doesn’t melt while you scramble for tools.
| Ingredient/Tool | Purpose |
|---|---|
| Unsalted Butter | The base of the creaming mixture; adds richness and structure |
| Granulated Sugar | Helps trap air in the butter and sweetens the mixture |
| Mixing Bowl | A deep bowl to prevent splattering |
| Electric Mixer or Stand Mixer | Makes the process faster and more even |
| Spatula | For scraping down the sides of the bowl |
Choosing the Right Butter
Not all butter is created equal. Always go for unsalted butter, especially in baking, because it gives you full control over the flavor. Salted butter can make your dessert taste slightly off or even too salty.
Make sure your butter is at room temperature before starting.
This means it should be soft enough to press gently with your finger but not melted or oily. Too cold and it won’t mix properly; too warm and it’ll turn greasy.
A good trick? Take it out of the fridge about 30–45 minutes before you start baking. If you forget, you can cut it into small cubes to speed up the softening.
The Science Behind Creaming 🧬
When you cream butter and sugar, you’re actually beating air into the butter. The sharp sugar crystals cut tiny holes in the butter, trapping air inside.
Later, when you add eggs and flour, those air pockets help everything expand and rise in the oven.
This is why creaming properly is the difference between a light, fluffy cake and one that feels like a brick. So yeah, it’s worth the extra few minutes!
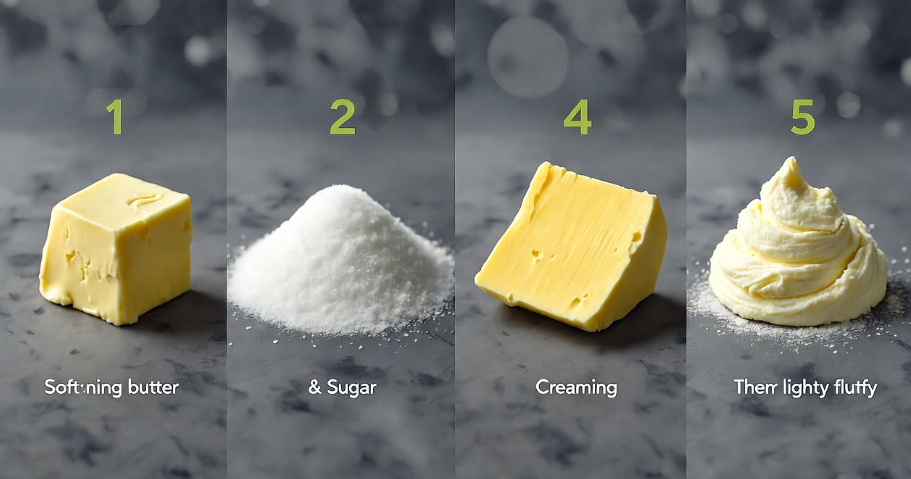
Step 1: Add the Butter to the Bowl
Place your room-temperature butter in a large bowl. If you’re using an electric mixer, attach the paddle attachment — not the whisk. The paddle mixes gently and helps trap air without making things too foamy.
Start by beating the butter on medium speed for about 30 seconds to 1 minute. You want it to become smooth, creamy, and a little lighter in color before adding sugar.
Step 2: Add the Sugar Slowly
Once the butter is soft and smooth, add your sugar gradually, not all at once. Pouring it in slowly helps it blend better and avoids overworking the butter.
Turn your mixer to medium speed and let it run for 2–4 minutes. You’ll see the mixture start to turn pale and fluffy — that’s the magic happening!
During this time, pause once or twice to scrape down the sides of the bowl with a spatula. This makes sure everything mixes evenly.
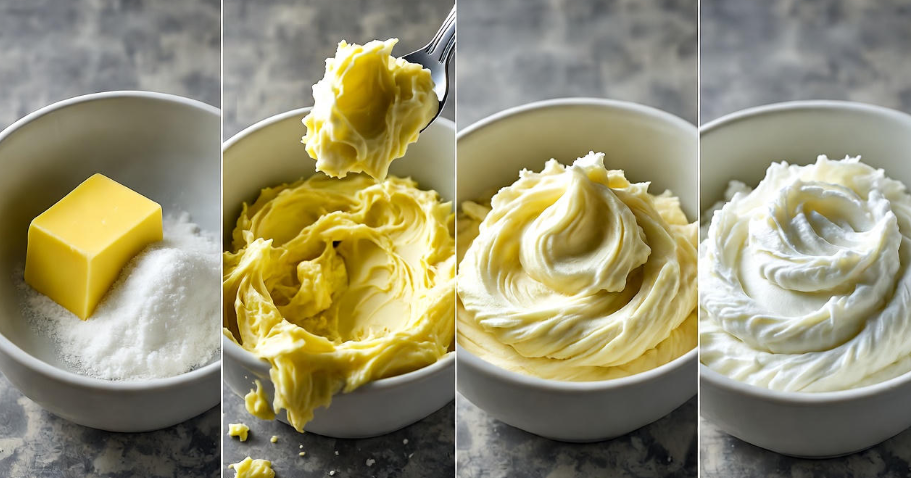
Step 3: Look for the Right Texture and Color
When the creaming is done correctly, your mixture will be:
Pale in color (almost white)
Soft and fluffy
Slightly grainy to the touch (because of sugar)
If it still looks yellow or greasy, it probably needs more mixing. But if it starts to look wet or separated, you’ve overmixed it — meaning the butter is getting too warm.
To fix that, pop the bowl in the fridge for 5–10 minutes, then mix briefly again.
Step 4: Add Eggs or Wet Ingredients (If Needed)
In most recipes, once your butter and sugar are perfectly creamed, you’ll start adding eggs. Do this one at a time. Add the first egg, beat well, then add the next.
If you add all eggs at once, the mixture can curdle or separate.
Don’t worry if it looks slightly uneven — that’s normal. Once you add flour or dry ingredients later, it will smooth out beautifully.
Step 5: Know When to Stop Mixing
Here’s something many beginners miss: you can over-cream butter and sugar.
Yes, it’s possible! Overmixing can cause the butter to trap too much air. Then, when you bake, those air bubbles collapse, leaving dense, uneven cakes.
So, as soon as your mixture looks pale, fluffy, and uniform — stop. No need to go further.
Common Mistakes to Avoid 🚫
Even though creaming seems simple, small mistakes can affect your entire dessert. Here are a few to watch for:
| Mistake | What Happens | How to Fix It |
|---|---|---|
| Using cold butter | Won’t blend smoothly | Let butter sit out before mixing |
| Adding sugar too fast | Uneven texture | Add sugar gradually |
| Overmixing | Dense, sunken baked goods | Stop when light and fluffy |
| Using melted butter | No air pockets | Always use room temp butter |
| Not scraping bowl sides | Uneven mixture | Scrape with spatula often |
How Long Should You Cream Butter and Sugar?
This depends on your mixer and ingredients, but usually 3 to 5 minutes on medium speed is perfect.
You’ll notice the texture change — it goes from yellow and grainy → to pale and fluffy → to soft and smooth. That’s when you know you’re done.
If you’re mixing by hand (yes, it’s possible!), it might take around 10 minutes and a bit of elbow grease. Use a wooden spoon and beat in circular motions, pressing the sugar into the butter.
Visual Signs You’re Doing It Right 👀
You don’t always need to rely on a timer. Use your eyes and hands to check these clues:
The mixture should be pale and creamy (not yellow)
When you rub a small bit between your fingers, it should feel light, not greasy
The volume should have increased slightly
It should hold soft peaks when lifted with a spatula
If you’ve got these signs — you nailed it!
Bonus Tip: Use the Right Sugar Type
Granulated sugar works best for traditional creaming. The rough edges of the crystals help cut into the butter and create air pockets.
However, if your recipe calls for brown sugar, the process is the same, but the mixture will be denser and slightly caramel-colored. Brown sugar adds moisture and a deeper flavor — perfect for cookies. 🍪
What Happens If You Skip Creaming?
Skipping this step can completely change your results.
Without creaming, there are no air pockets for expansion, so your cake may:
Rise poorly
Taste dense
Have a heavy mouthfeel
Look flat or greasy
So yes, creaming is worth the effort — even if you’re short on time.
Troubleshooting Creaming Problems
| Problem | Reason | Quick Fix |
|---|---|---|
| Mixture looks curdled | Butter too cold or eggs added too fast | Add 1 tbsp flour and mix again |
| Butter melted while mixing | Mixer too hot or overmixed | Chill for 10 minutes and resume |
| Too stiff mixture | Butter not soft enough | Let it sit at room temp a bit longer |
| No volume increase | Not enough mixing time | Mix another minute or two |
The Perfect Creaming Ratio
Most classic baking recipes follow this ratio:
1 part butter to 1 part sugar
For example, if your recipe has 1 cup of butter, you’ll likely need about 1 cup of sugar. This ratio helps create just the right balance of texture and sweetness.
How Creaming Changes Your Final Product
| Recipe Type | Effect of Creaming |
|---|---|
| Cakes | Light, fluffy, even rise |
| Cookies | Crispy edges, soft center |
| Cupcakes | Smooth crumb texture |
| Muffins | Airy and tender bite |
Each dessert gets its own personality based on how well you cream the butter and sugar. That’s why professional bakers never skip this step — it’s their secret weapon for perfection.
A Small Trick from Bakers 🤫
If you’re creaming butter and sugar in a warm kitchen, place your mixing bowl over a bag of frozen peas or a cold towel. This keeps the butter cool and helps maintain the perfect texture.
Also, if you want an extra fine result, you can sift your sugar before adding it to the butter. This makes mixing smoother and prevents clumping.
Frequently Asked Questions (FAQs)
Q1: Can I use a whisk instead of an electric mixer?
Yes, but it’ll take longer and require more effort. Use a sturdy whisk or wooden spoon and mix vigorously for about 10 minutes.
Q2: How do I know if my butter is too warm?
If it looks shiny, oily, or feels soft like melted cheese, it’s too warm. Pop it in the fridge for 10 minutes before creaming.
Q3: Can I cream butter and sugar ahead of time?
It’s best to use it right away. If you let it sit too long, the air pockets collapse and your mixture loses its fluffiness.
Q4: Why did my mixture curdle after adding eggs?
That usually means your eggs were too cold. Use room-temperature eggs to prevent curdling.
Q5: What if I use brown sugar instead of white?
It’ll work, but your mixture will be denser and moister. Great for cookies, but not ideal for light cakes.
Final Thoughts 💭
Creaming butter and sugar might seem like a small detail in a recipe, but it’s one of those little baking secrets that truly separates good desserts from great ones. It’s the moment where air, flavor, and texture come together — the base for everything that follows.
So next time you grab your mixer, take a few extra minutes for this step. Beat that butter and sugar until it looks light and dreamy.
Because honestly, that’s where the magic begins — in the bowl, with a spoonful of butter and sugar, and a little bit of patience. ✨