It’s a magical thing to do — bake with your hands. With that crisp, golden shell, the pillowy interior and that intoxicating fragrance filling your kitchen — it’s purely satisfaction. But can we be real? It can feel pretty frustrating to bake bread at home when things go wrong. Your loaf might end up flat, or dense, or so tough it could double as a doorstop.
The good news? Most bread failures are very easy to fix. Whether you’re making your first loaf or have baked dozens, even hundreds, these are some of the most common errors that might be wreaking havoc with your bread without you even realizing it. I’ve baked hundreds of loaves, and met dozens of failures head-on — so I know exactly what sets gorgeous bakery-quality bread apart from brick-like disappointments.
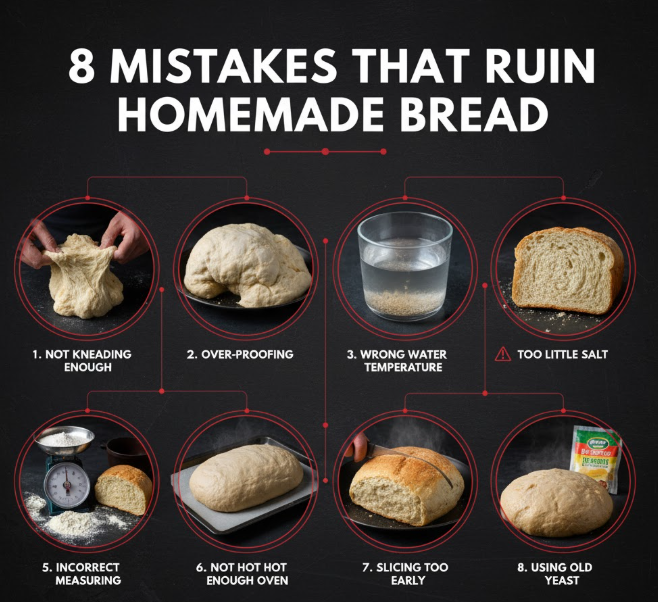
In this guide, we’ll take you through the eight most common mistakes that destroy homemade bread. And more importantly, you’ll learn how to prevent them so your next loaf comes out just right. And don’t even think about buying any fancy equipment — all you need is some smarts and attention to detail. We are going to solve all of your bread problems once and for all.
Mistake #1: The Water is Too Cold (or Too Hot)
You’d think that a little thing like water temperature wouldn’t make much of a difference, but it’s actually maybe the most crucial variable in bread baking. I’m so confident you can do it, it’s just tiny living organisms at play. Like so much in life, they wake lovingly and do their job beautifully but only if given the right conditions.
When your water is too hot — anything over 120°F (49°C) — you will actually kill the yeast. It’s as though they’ve been dropped into boiling water. And dead yeast is incapable of creating the carbon dioxide bubbles required to puff up our bread; it will be dense and brick-like instead of chewy and light.
And on the opposite end, if the water is too cold (below 70°F or 21°C), it won’t activate the yeast properly. They will not be kept from their places, working modestly. Your dough is going to rise very, very slowly, if at all. This is especially common during winter when cold tap water is often used.
The sweet spot: For active dry yeast, seek water between 105-110°F (40-43°C). It should be warm on your wrist, but not hot — like bathwater for a baby. For instant yeast, you can go just a bit warmer, to around 120-130°F (49-54°C), because it’s mixed right into flour.
If you don’t have a thermometer, here’s an easy trick: Two parts cold water to one part boiling water. This will be about the right temperature. Try a little on your wrist — it should feel pleasantly warm, not hot, you can bathe right away.
Mistake #2: Measuring Flour Incorrectly
It’s with flour measurement that many of us home bakers go most completely off track. If you are dipping your measuring cup into the bag of flour, then you are likely using 50% too much flour! This packing technique can add 20-30% additional flour to the recipe.
An excess of flour makes for dense, dry bread that’s hard to chew. The dough is stiff and hard to knead, and it doesn’t rise well since there isn’t enough moisture to turn into steam and crumb structure.
The correct way to measure: Spoon and level. Fluff up your flour with a spoon, then scoop it gently into the measuring cup. Level it off with a straight edge (like a butter knife) without compacting it. This will give you a precise measurement.
Even better? Start using a kitchen scale to measure your ingredients. Serious bakers weigh their flour. It is so much more accurate. 1 cup of flour should weigh 120 to 125 grams. If you weigh it out and it’s 150 grams, you’re using too much of it.
The following chart puts the impact in perspective:
| Method of measuring | Flour used | Outcome |
|---|---|---|
| Scooping directly | 150-160g per cup | Crumbly, dry loaf |
| Spoon and level | 120-125g per cup | Moist loaf |
| Weighing with scale | As per recipe | Correct recipe amount, consistency |
Mistake #3: Not Kneading for Long Enough (or Over-kneading)
Kneading builds that gluten network, a web of proteins that provide bread with structure and chew. If you don’t knead enough, your bread won’t be strong enough to hold air bubbles and rise properly. The result? A crumbly, falling-apart mess.
The majority of bread doughs require 8-10 minutes of hand kneading or 5-7 minutes in the stand mixer. You’re looking for the dough to change from shaggy and sticky into a nice smooth, elastic dough. It should spring back when you touch it.
You certainly cannot stop kneading too soon, but you can over-knead. Though that’s rare with hand kneading. If you knead too long, especially in a strong stand mixer, you’ll tear the gluten structure apart. The dough is slack, sticky and will not keep its shape.
In an ideal world, the windowpane test is your pal right now. Place a small piece of dough between two fingers and stretch gently. If you can stretch it so thin you can see light through without tearing, your gluten is well-developed. If it rips right away, then keep kneading.
Watch for these signs:
- Under-kneaded: The dough is easily torn and rough looking, won’t hold its shape.
- Kneaded until perfect: Smooth on top, springs back when you poke it, passes the windowpane test.
- Over-kneaded: Extremely sticky, no stretch, and it’s like a liquid (not common at all with hand kneading).
Mistake #4: Not Allowing Enough Time to Rise (or Giving Too Much Time)
Patience isn’t simply a virtue when it comes to bread making — it’s the key. The rising time (also known as proofing) is when yeast does its magic, releasing air bubbles and building flavor. Try to make it in a rush, and you have heavy, flavorless bread.
A lot of new bakers read “let rise for 1 hour” in a recipe and take that as gospel. In fact, rising time is very room-temperature dependent! At warmer temperatures in the kitchen (75-80°F or 24-27°C), it will rise even faster. In cool conditions (65°F, 18°C) it takes much longer.
The dough is done when it’s roughly doubled in size. Here’s the finger test: Push a finger gently about half an inch into the dough. If the hole remains, it is done. If it springs back at once, let it rest longer. If it deflates, you’ve over-proofed.
Common rising problems:
Inadequate rise time: There should be air pockets in bread because fermenting dough creates carbon dioxide bubbles; if there aren’t enough air pockets your crumb will be tight; this is sometimes called heavy when you’re referring to whole grain loaves. It may also smell quite yeasty, as the yeast has not yet had time to complete its job of gobbling up sugars.
Too much rise time: Overproofed dough is not strong and will collapse. The gluten gives way, and the bread will collapse in oven or be full of big irregular holes.
Trouble with temperature: If your kitchen is particularly chilly, create a warm place. The best way to fix any proofing problem: Simply turn your oven on for 1 minute, then off and place the dough inside (ensure it’s not too warm!). Or set the bowl near (but not on) a warm radiator.
Most bread requires two rises: once after kneading (bulk fermentation) and again after the dough is shaped (the final proof). Don’t rush through the second rise — it’s just as important as the first.
Mistake #5: Old, Poorly Stored Yeast
Yeast is a living organism, and like all living organisms, it has a life span. The fastest way to make sure your bread is a flop is to use old yeast. Dead or weak yeast is just not going to generate enough gas that’s necessary for the rising of your bread.
Yeast dies from air, moisture, heat — or simply time. That jar you bought two years ago and shoved in the back of your pantry? Probably dead. And even if it says it’s good until next year, poor storage can kill it early.
How to store yeast properly:
- Store unopened packages in a cool, dry place.
- Once opened, keep in an airtight container in the refrigerator (or even the freezer for long term storage).
- Always inspect the expiration date prior to use.
- Before using refrigerated yeast, even if it hasn’t reached room temperature, it’s best to let it warm up on the counter for 20-40 minutes.
The proof test: Test your yeast before you start your bread. Add yeast to warm (110°F/43°C) water with a teaspoon of sugar dissolved in it. Wait 5-10 minutes. If it’s foamy and bubbling, your yeast is alive and ready. If nothing happens, purchase new yeast.
Yeast varieties:
- Active dry yeast: Has to be dissolved in water first.
- Instant yeast: Can be combined directly with flour; works faster.
- Fresh yeast: Highly perishable, needs to be refrigerated, has a very short shelf life.
Mistake #6: Wrong Dough Consistency
The consistency of your dough — how wet it is, or not — makes a vast difference in the bread that comes out of your oven. This is where the “feel” of making bread comes into play, and why a baker with experience usually changes up recipes as they go.
There are so many things that determine how much liquid your dough needs: the humidity in your kitchen, the protein content of your flour, even how you measured it. A recipe may demand 1 cup of water, but you could really need 3/4 cup or 1 1/4 cups.
Too dry: A stiff dough that is difficult to knead yields a dense, crumbly bread. The yeast won’t be able to move through it as well, and it won’t rise as easily.
Too wet: Though professional bakers often work with very wet doughs (to produce those tall, open crumbs), beginners usually meet their match with sticky dough. It’s difficult to shape, it likes to spread out instead of rise up and can make gummy bread.
Find the sweet spot: Your dough should be pleasantly tacky to the touch, not sticky everywhere. When you press it, it should feel soft and tender as a baby’s bottom (that’s what old bakers say). If it’s sticking to your hand you’ll need to add flour a tablespoon at a time. If it’s too hard or tears when you fold it, sprinkle with more water, a tablespoon at a time.
Don’t add all of your flour in one go. Reserve about 1/4 cup of flour and add it as needed, as you knead. You can always add more flour, you can’t take it out.
Mistake #7: Baking at the Wrong Temperature
Oven temperature is more elusive than you might suppose. Your oven thermometer is probably lying to you. Plenty of home ovens are 25-50°F too hot — or too cold — compared to what the dial reads. An oven thermometer is cheap and changes everything.
The majority of breads are baked between 350-450°F (175-230°C), depending on the type. Lean breads (those made with relatively little fat and sugar) usually require hotter temperatures, about 400 to 425°F, while enriched breads typically bake at lower temperatures (350 to 375°F) so as not to cause over-browning.
Too hot: The crust browns and might even burn before the inside has fully cooked. You may well end up with bread that is gorgeous on its surface but gummy and underbaked within.
Too cold: Bread bakes way too long and ends up dry; the crust is pale and tough instead of golden and crisp.
The right approach:
- Use a Preheated Oven: You want the oven to get prewarmed for at least 20-30 minutes. The air temperature as well as the walls/racks all need time to come up to temp.
- Place Middle Oven Rack: Position your rack in the center of your oven so it heats evenly.
- If your bread is browning too fast, tent it with foil during the final 15 minutes.
- To create steam during the first 10-15 minutes of baking, put a pan of hot water on the bottom rack. The steam also contributes to a crisp crust.
Bread is ready when it sounds hollow when tapped on the bottom and registers 190-200°F (88-93°C) on an instant-read thermometer inserted in the middle.
Here’s a quick reference:
| Type of bread | Temperature | Time |
|---|---|---|
| White sandwich | 375-400°F | 30-35 minutes |
| Whole wheat | 350-375°F | 35-40 minutes |
| Artisan/crusty bread | 425-450°F | 25-35 minutes |
| Dinner rolls | 375-400°F | 18-22 minutes |
| Enriched (brioche, etc.) | 350-375°F | 25-35 minutes |
For more detailed guidance on bread baking temperatures and techniques, check out King Arthur Baking’s comprehensive bread guide.
Mistake #8: Slicing the Bread Prematurely
I know it’s hard to resist. It emerged from the oven looking beautiful, it smells amazing and you want to cut into it right this minute. But hot bread is a textural mistake waiting to happen.
At the start, bread is still cooking inside as it cools. The moisture in the crumb is moving around for a more evenly hydrated loaf. Cut it too soon and out comes all that steam, leaving you with gummy, doughy bread that appears to be underbaked.
Why it matters that you wait: The inside structure just needs time to firm up. The starches are still gelatinizing, and the crumb is setting. Cutting too soon would destroy this fragile process.
How long to wait: Most loaves require at least 1-2 hours of cooling time before slicing. Large, crusty artisan breads require 3 to 4 hours. I realize that seems like an eternity, but it’s the difference between night and day.
The cooling process:
- Remove bread from the pan immediately (when not otherwise directed by the recipe).
- Transfer to a wire cooling rack so air can go all the way around it.
- Don’t cover it or bag it while still warm — you will steam the bread and end up with a soggy crust.
- Wait until it’s barely warm or room temperature before cutting.
The exception: Some quick breads, like banana bread or sweet loaves are good sliced a little warm. But yeasted breads absolutely require all of their cooling time.
When you finally slice your bread, use a serrated bread knife in a gentle sawing motion. Forcing down with a normal knife also crushes the loaf and results in squashed, inconsistent slices.
How to Know When Your Bread Is Done
Now that you know what not to do, here’s what good bread should look like:
Before baking:
- Dough is smooth, elastic and just a bit sticky.
- It has grown to be twice the size while rising.
- It resists when poked and springs back slowly.
- It keeps its shape after molding.
During baking:
- Oven is properly heated.
- It develops a golden-brown crust.
- Your kitchen smells amazing.
After baking:
- If you tap on the bottom it sounds hollow.
- Internal temperature reads 190-200°F.
- The crust is crunchy, not pale or burnt.
- The crumb is soft with even holes after it has cooled.
- It’s easy to slice without crushing.
Quick Troubleshooting Guide
- Heavy, dense bread: Not kneaded long enough, didn’t let the dough rise long enough or too much flour in the recipe. Also, the yeast could be dead.
- Bread didn’t rise: Dead yeast, too hot/cold water, not enough time to rise, or too chilly conditions.
- Dense, rubbery bread: Over-floured, over-kneaded or baking temperature too low.
- Gummy center: Cut too hot, oven temperature too low, or not baked long enough.
- Pale crust: Oven is not hot enough, or not enough sugar in the recipe.
- Burned crust, raw center: Oven too hot.
- Bread deflated: Over-risen, too much liquid, or oven not hot enough.
FAQs
Can I substitute all-purpose flour for bread flour?
Yes, you can! Bread flour has a higher protein content (12-14%) which makes stronger gluten and chewier texture but all-purpose flour (~10-12% protein) is fine for most recipes. You may end up with bread that’s a little less chewy, but still delicious.
How do I know if my dough is sufficiently kneaded?
Try the windowpane test: stretch a tiny piece of dough between your fingers. If you can stretch it so thin that light comes through without tearing, you have the right dough! The dough also should feel smooth and elastic and spring back when pinched.
Why do I have these big holes in my bread?
Big, random holes tend to be the result of over-proofing (letting it rise for too long) or uneven shaping that trapped pockets of air. Gently deflate any large air bubbles as you shape your loaf.
May I allow bread dough to rise overnight?
Absolutely! In fact, a slow rise in the fridge (8-24 hours) allows for better flavor development. Allow the dough to rise once, form it, put in the pan, cover tightly and refrigerate. Let sit at room temp to come up to temperature then bake.
What is the white stuff on my bread crust?
That’s flour that didn’t get mixed in or was dusted on top. It’s completely harmless. If you don’t like the look, brush your loaves with a bit of water or egg wash before baking.
Do I need a bread machine or stand mixer to make bread?
Nope! Humans made bread by hand for thousands of years before these machines existed. Hand kneading is every bit as good (and sometimes better because then you have a feel for what the dough should be).
Why does my homemade bread become dry by the next day?
Preservatives are not added to homemade bread as they are in bakery and store-bought bread, so it expires more quickly. Cool completely and store in a zip-lock bag or bread box at room temperature. Never refrigerate bread — it ages it more quickly. For longer storage, slice it and freeze.
Can I freeze bread dough?
Yes! Freeze it after the first rise. Let the dough sit at room temperature for an hour and a half to two hours, until puffed up. Defrost in the refrigerator overnight, allow to come to room temperature, do the final rise and bake.
Your Path to Better Bread
Baking great bread at home isn’t about closely following recipes — rather, it’s about gaining an intuition of what is actually happening at each step. Having learned these eight common mistakes, you’ll now be able to stop them before they sabotage your loaf.
Keep in mind: even professional bakers end up with failures on occasion. Bread is forgiving, because every mistake tells you something. Your early loaves won’t be perfect, and that’s all right. Every time you bake, you will get a better understanding of the dough, know what “properly kneaded” feels like and develop an instinct for when things are right.
Start with a simple recipe. Get the basics down before tackling sourdough or fancy enriched breads. Pay attention to how the dough feels at each step. Take notes if it helps. Then you’ll be pulling beautiful golden loaves from your oven in no time and thinking to yourself: What was ever the big deal?
It’s so supremely satisfying to slice into a loaf you mixed up from scratch. Not only is your kitchen going to smell fantastic, everyone in the family comes calling and you will have added a skill that ties you to thousands of years of human history. So pull out a little flour, wake up the yeast and get baking. Your perfect loaf is waiting.